

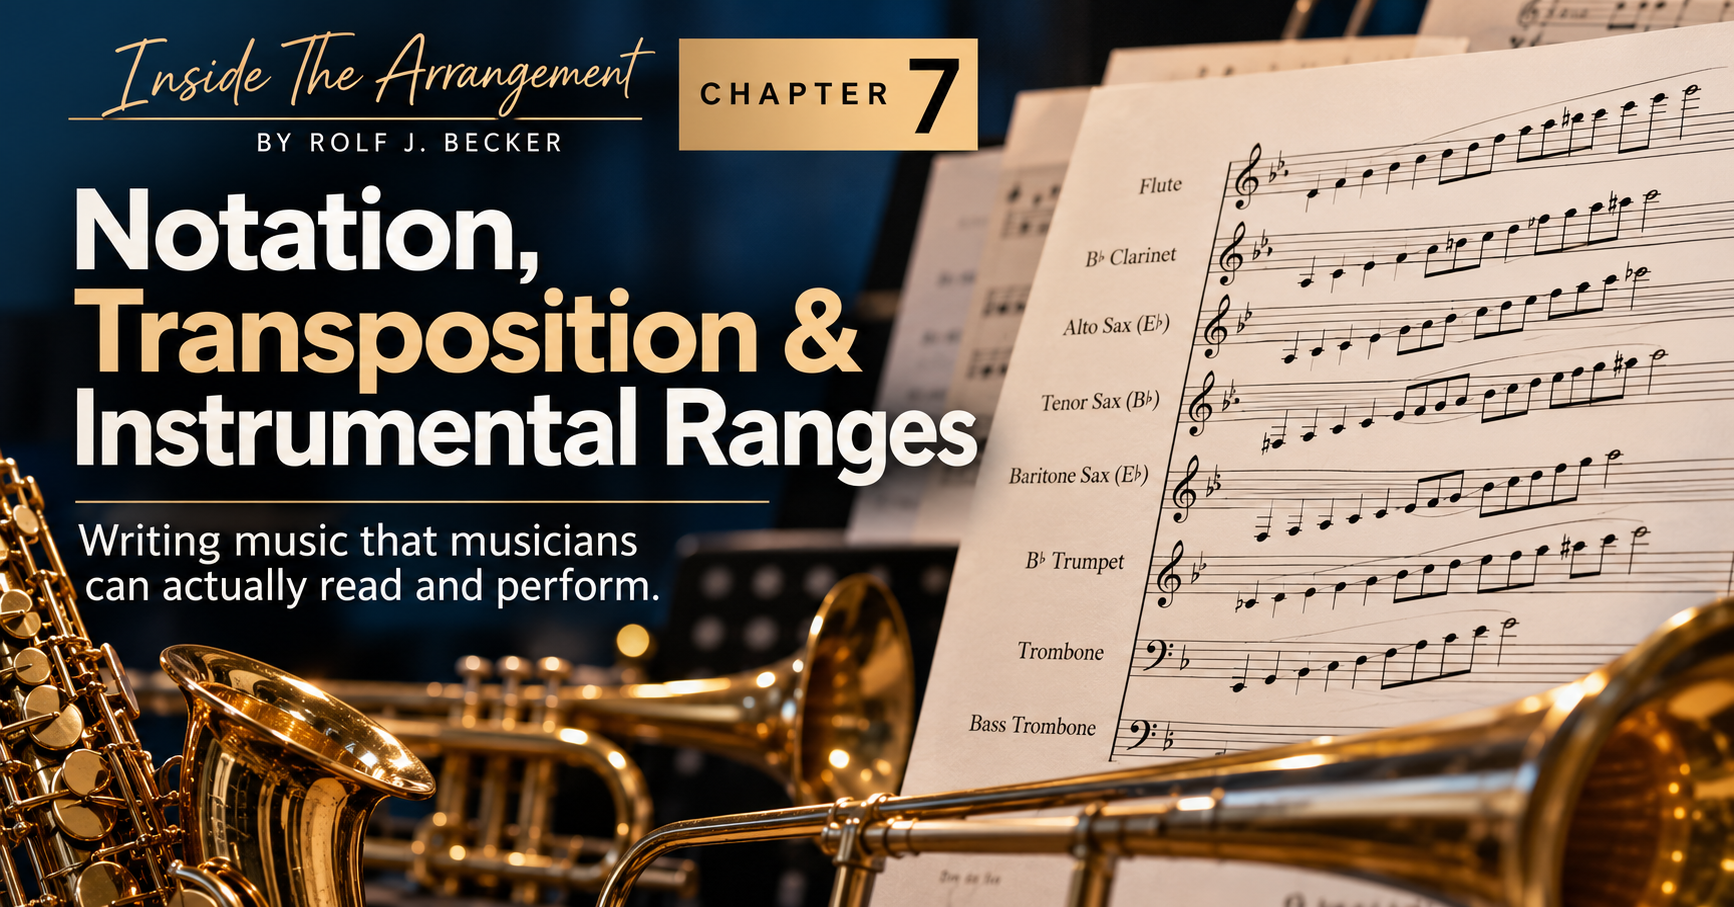
INSIDE THE ARRANGEMENT — Chapter 7 — Notation, Transposition & Instrumental Ranges
A professional Big Band arrangement requires more than great musical ideas. In Chapter 7 of Inside The Arrangement, composer and arranger Rolf J. Becker explores instrument transposition, written versus concert pitch, practical brass and woodwind ranges, and the essential principles of clear, professional music notation.
Writing music that musicians can actually read and perform.
By Rolf J. Becker
A beautiful musical idea deserves a beautifully prepared score.
Throughout my career as a composer, arranger, conductor, and instrumentalist, I have learned that even the most imaginative arrangement can become unnecessarily difficult when its notation is unclear.
Incorrect transpositions, impractical instrumental ranges, inconsistent articulations, or poorly prepared parts can create confusion and waste valuable rehearsal time.
In Chapter 6, we explored how orchestration gives our music its colors.
Now we turn to an equally important question:
How do we communicate those musical ideas clearly to the musicians who will perform them?
1. Concert Pitch vs. Written Pitch
One of the first things every arranger must understand is the difference between concert pitch and written pitch.
Concert pitch is the actual sounding note.
Written pitch is the note displayed in the musician's part.
For example, when a B-flat trumpet player performs a written C, the instrument sounds a concert B-flat.
If we want that trumpet to sound concert C, we must write D.
The same principle applies to B-flat clarinet and the saxophone family, although the precise transpositions differ.
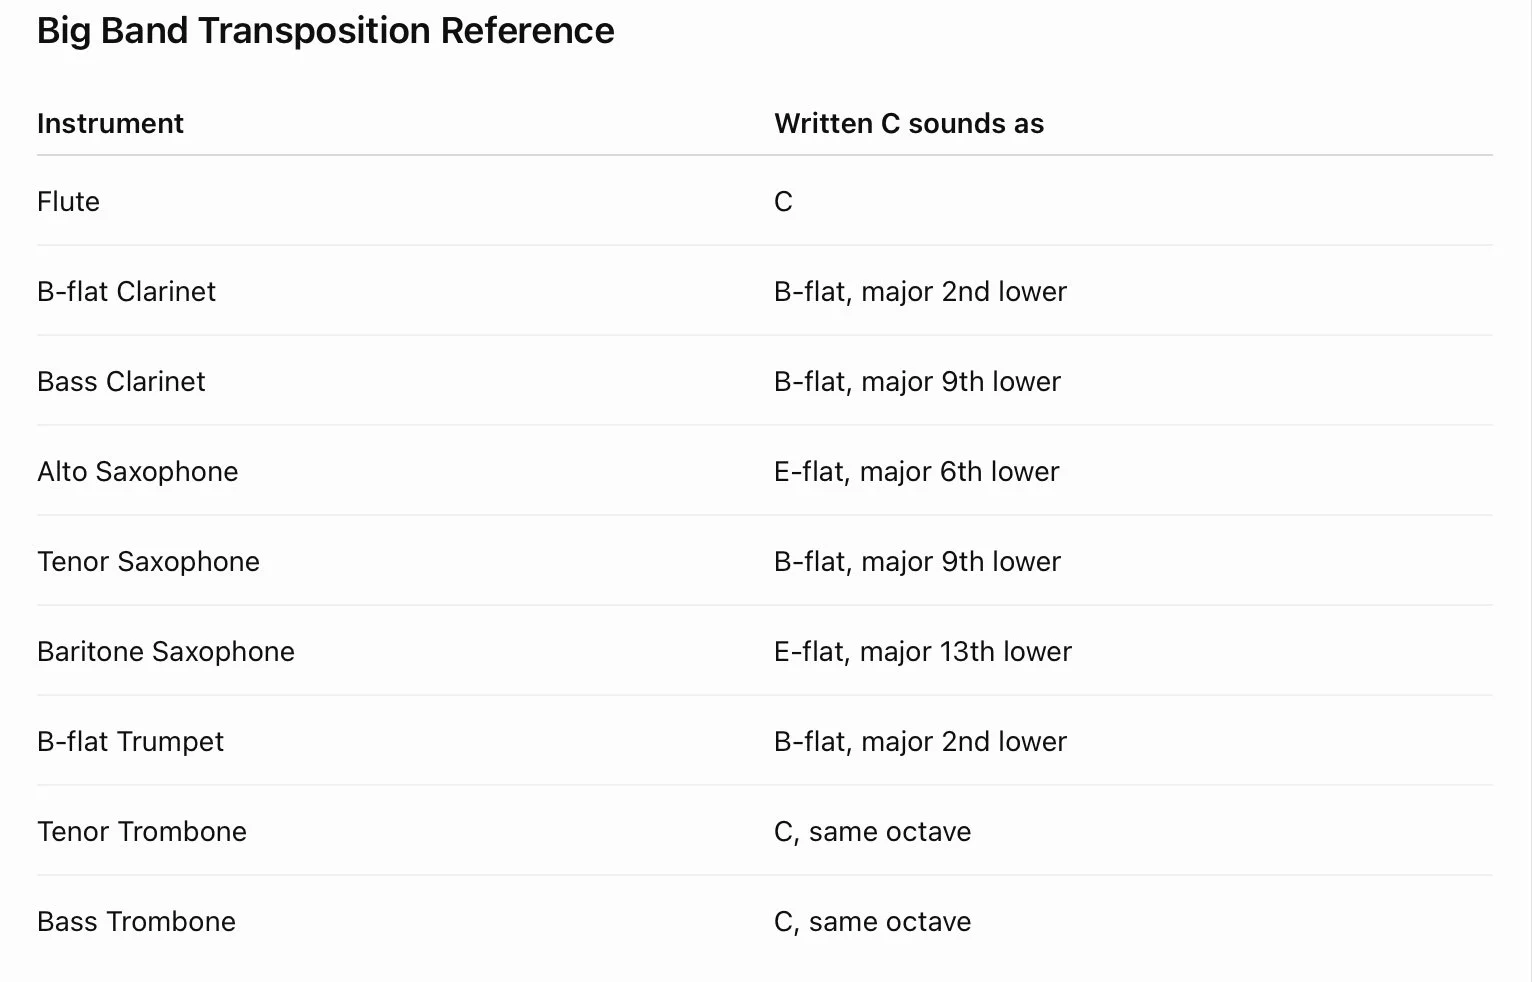
Big Band Transposition Reference (Inside The Arrangement — Chapter 7)
Important: In standard Big Band notation, tenor trombone and bass trombone are written in bass clef at concert pitch.
Although the tenor trombone is commonly described as a B-flat instrument, this refers to its fundamental tubing pitch—not a transposition of its standard bass-clef part.
2. Why Octaves Matter
Transposition involves more than changing the key signature.
The tenor saxophone sounds a major ninth below its written pitch.
The baritone saxophone sounds a major thirteenth below its written pitch.
Both instruments therefore include an octave displacement.
An arranger who overlooks this detail may produce an entirely different register from the one intended.
Modern notation software makes transposition considerably easier, but I strongly recommend understanding these relationships rather than relying exclusively on automatic functions.
Software is a tool. Musical knowledge remains essential.
3. Instrumental Ranges: Possible Doesn't Always Mean Practical
Every instrument has a physical range.
But that doesn't mean every player can perform every note within that range comfortably.
A professional lead trumpet player may perform high notes that would be entirely inappropriate for a developing student.
A professional saxophonist may use altissimo fingerings that an intermediate player has not yet mastered.
And a trombone passage can be difficult because of rapid slide movement, even when every note lies within the instrument's normal range.
For this reason, I distinguish between three levels when preparing arrangements:
Beginner: A conservative register that allows players to develop reliable tone, intonation, and confidence.
Intermediate: A broader range suitable for musicians with established technical skills.
Advanced / Professional: An extended range that may include demanding registers and specialized techniques.
These categories are practical guidelines, not fixed rules.
A Few Important Instrumental Details
Alto and Tenor Saxophones: Their standard written ranges are broadly similar, but their sounding registers differ. Altissimo should not be assumed available to every player.
Baritone Saxophone: Many modern instruments have a written low A, but others stop at low B-flat. Check the available instrument before requiring low A.
Flute: Its usual lowest note is middle C, although a B-footjoint allows written B3. The upper register requires increasing control.
Clarinet and Bass Clarinet: Their registers behave differently, and the bass clarinet's lowest available notes depend on the instrument's extension.
Trumpet: Upper-register endurance matters just as much as the highest note.
Tenor and Bass Trombone: Consider slide movement, valve configuration, articulation, and the demands of the low register.
The most important principle is simple:
Write for the musician, not merely for the theoretical range of the instrument.
4. A High Note Is Not the Whole Story
Consider two trumpet passages.
The first contains one demanding high note at the end of an otherwise comfortable phrase.
The second contains repeated high notes over several measures, played fortissimo.
Both passages may reach the same highest pitch.
Yet their technical demands are entirely different.
Endurance, articulation, dynamics, tempo, and recovery time must all be considered.
This applies to other wind instruments as well.
Good arranging requires an understanding of how musicians experience a passage from beginning to end.
5. Articulation and Dynamics: The Details That Matter
Correct notes and rhythms are only the beginning.
A short accented note produces a different musical result from a tenuto note.
A legato phrase requires a different approach from a passage of repeated marcato accents.
And a written forte does not produce the same perceived volume on every instrument.
These details are especially important in Big Band writing, where the precision of a section depends on consistent articulation and phrasing.
As a conductor, I regularly hear how much difference a unified note release can make.
Sometimes a passage doesn't need to be rewritten.
It simply needs clearer notation.
6. Preparing Professional Individual Parts
An arrangement is not finished when the full score looks correct.
Every individual part must be checked.
I recommend paying particular attention to:
Correct transpositions and sounding octaves
Clear rehearsal marks and measure numbers
Consistent articulation and dynamics
Readable staff size and spacing
Practical page turns
Multimeasure rests and useful cues
Sufficient time for instrument and mute changes
A well-prepared part allows musicians to concentrate on the music instead of correcting avoidable mistakes.
7. The Professional Arranger's Checklist
Before delivering an arrangement, ask yourself:
Are all transposing instruments correctly notated?
Are the written ranges appropriate for the intended musicians?
Have I considered endurance, articulation, and instrument-specific limitations?
Are the individual parts readable and professionally prepared?
Does the score communicate exactly what I want the musicians to perform?
These questions may seem straightforward.
But answering them carefully can make an enormous difference in rehearsal and performance.
Final Thoughts — Respecting the Musician
Professional notation is a sign of respect.
It respects the musician's time, preparation, and technical responsibilities.
It also respects the composition.
Throughout Inside The Arrangement, I have emphasized that arranging is about making musical decisions.
Notation is how we communicate those decisions.
A professional arrangement is not finished when the notes are written. It is finished when the musicians can understand and perform them as intended.
Discover my original Big Band arrangements, small ensemble charts, and educational music in the MusicMyLanguage Music Library.
Explore the complete Inside The Arrangement educational series, where we develop professional Big Band arrangements step by step.
Coming Next — Chapter 8: The Art of Voicing
From Closed Position to Clusters
How do we distribute chord tones among the instruments of a Big Band?
What distinguishes closed voicing from Drop 2 or Drop 4?
How do clusters create tension and color?
And how can voice leading transform a simple harmonic progression into a convincing ensemble sound?
In our next chapter, we'll explore these techniques using practical examples from my original composition Just Take It Easy.
Rolf J. Becker
Composer · Arranger · Conductor
MusicMyLanguage — Learn. Practice. Perform.
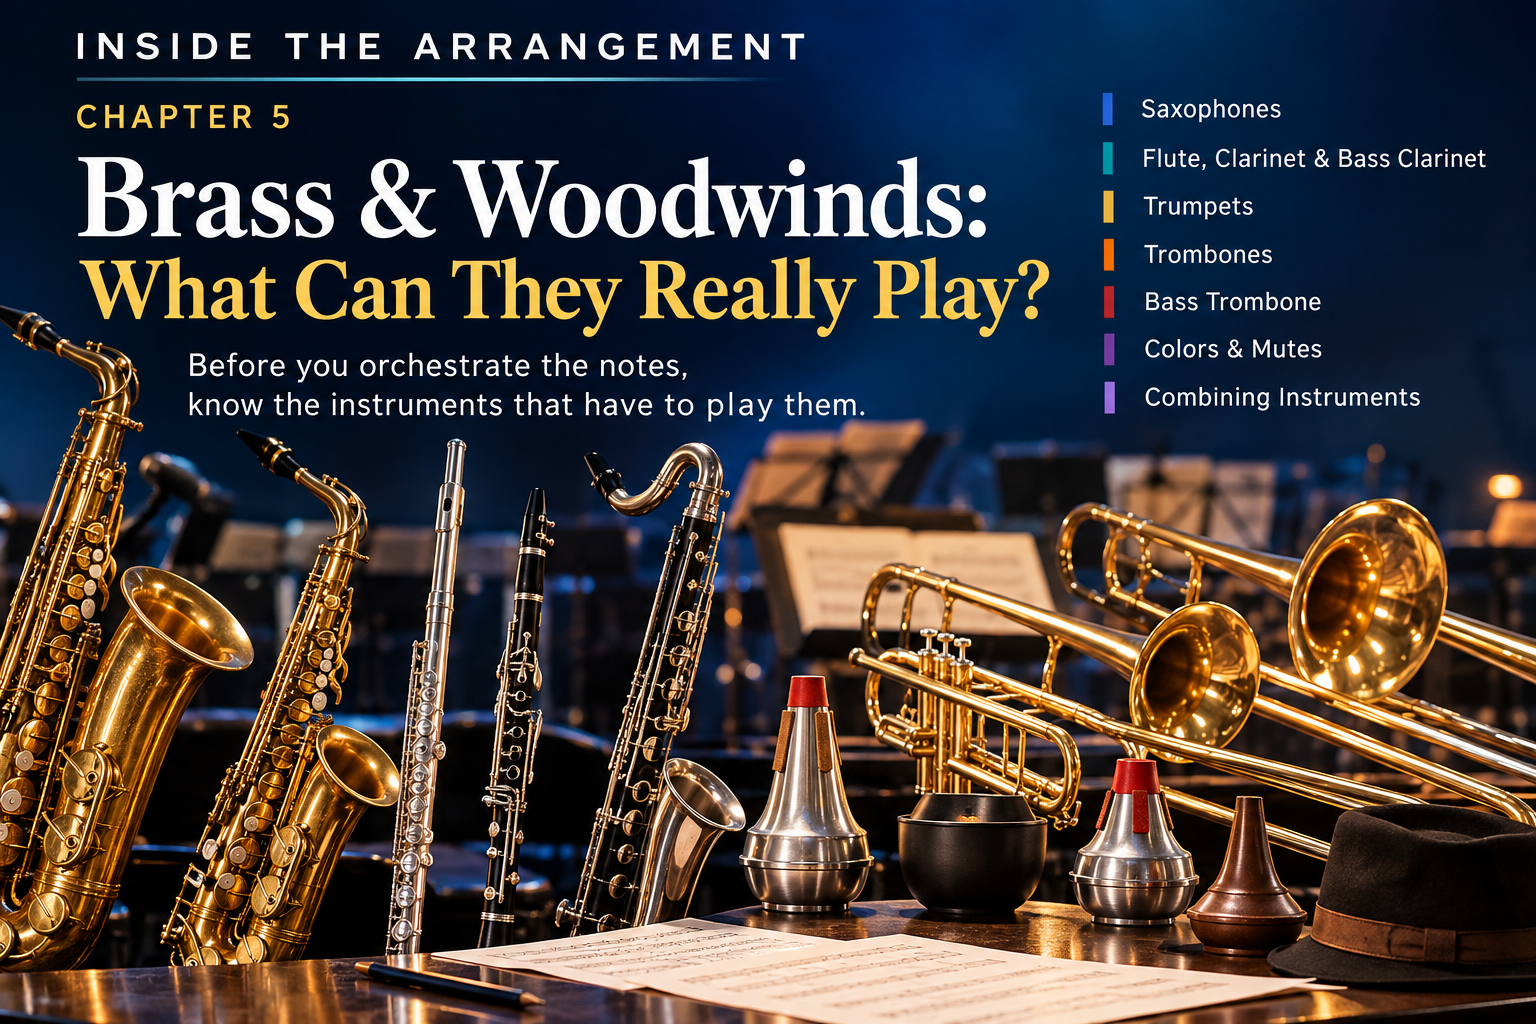
INSIDE THE ARRANGEMENT
Knowing an instrument’s range is not the same as knowing how to write for it. In Chapter 5 of Inside The Arrangement, we explore the practical registers of saxophones, woodwind doubles, trumpets and trombones—and how register, mutes and instrumental combinations shape the colors of a big-band arrangement.
Chapter 5 — Brass & Woodwinds: What Can They Really Play?
Before you orchestrate the notes, know the instruments that have to play them.
We have built the foundation of our arrangement.
The bass provides harmonic direction and movement.
Piano and guitar help establish harmony, rhythm and color.
The drums provide pulse, energy and interaction with the entire ensemble.
Now it’s time to turn our attention to the instruments that will give a big-band arrangement much of its character, power and color:
The brass and woodwinds.
But before we start writing saxophone solis, trumpet voicings, trombone backgrounds or powerful brass tuttis, there is a fundamental question every arranger needs to understand:
What can these instruments actually do?
At first, the answer seems simple.
Look at a range chart.
Find the lowest note.
Find the highest note.
Stay somewhere between the two.
Unfortunately, it isn’t quite that simple.
Because knowing the range of an instrument is not the same as knowing how to write for it.
⸻
RANGE IS ONLY THE BEGINNING
A range chart tells us which notes an instrument can theoretically produce.
That’s useful information.
But for an arranger, it isn’t enough.
A note may be technically possible but uncomfortable.
Another note may be perfectly comfortable but have the wrong character for the musical passage.
A note that works beautifully for an experienced professional may be unreliable for a student or developing player.
And some registers require specialists.
The most obvious example in a big band is the lead trumpet.
So when I’m writing an arrangement, I don’t only ask:
Can the instrument play this note?
I also ask:
Who is going to play it?
How difficult is it in this musical context?
And what will it sound like?
That gives us three useful ways of thinking about range.
1. Comfortable / Core Register
This is the part of the instrument where most competent players can perform reliably and where the instrument generally speaks naturally.
2. Advanced / Professional Register
These notes are absolutely usable, but the demands on the player increase.
Dynamics, articulation, endurance, tempo and the surrounding musical material all become increasingly important.
3. Specialist / Extreme Register
These notes may be possible—and sometimes spectacular—but they require the right player.
They should be used because the music needs them, not simply because a range chart says they exist.
And that brings us to an important distinction:
Range tells us which notes are available.
Register tells us what happens to the sound when we use them.
Not every register has the same character.
Let’s look at the instruments.
⸻
1. THE SAXOPHONES
The standard big-band saxophone section usually gives us five chairs:
Alto 1
Alto 2
Tenor 1
Tenor 2
Baritone
On paper, these instruments have substantial ranges.
But again, the question isn’t simply how high or low they can play.
Where do they sound best for what I want to achieve?
An alto saxophone in its middle register can sound warm, clear and flexible.
Move upward and the sound becomes increasingly brilliant and penetrating.
A tenor saxophone can move from a rich, warm character into a much stronger and more projecting upper register.
The baritone saxophone gives us tremendous weight at the bottom of the section, but it can also be surprisingly agile and powerful higher in its register.
The arranger therefore isn’t merely choosing pitches.
We are choosing character.
And there is another reason the saxophone section is particularly interesting.
The players sitting behind those five saxophones may give us considerably more than five instrumental colors.
⸻
2. THE DOUBLERS — FLUTE, CLARINET & BASS CLARINET
In professional big-band and studio writing, saxophone players are frequently asked to double on other woodwind instruments.
Common doubles include:
Flute
Clarinet
Bass Clarinet
And depending on the music and personnel, other woodwind doubles may also be available.
This gives the arranger an enormous palette of colors.
But it also introduces an important practical consideration:
A great saxophonist is not automatically an equally great flutist or clarinetist.
Professional woodwind doublers spend years developing those additional instruments.
So before writing a demanding flute passage into an alto chair simply because the player also owns a flute, consider who will actually perform the arrangement.
The same principle we used throughout the previous chapters applies here:
What does the player need—and what can I reasonably ask the player to do?
The reason for using doubles shouldn’t simply be:
Because they’re available.
It should be:
Because I want that sound.
A flute can add lightness and transparency above a saxophone texture.
A clarinet can blend beautifully into a saxophone section while introducing a different character.
A bass clarinet can add a dark, warm color underneath tenor and baritone saxophones.
These aren’t merely extra instruments.
They are additional colors.
And color is becoming increasingly important to our arrangement.
⸻
3. THE TRUMPETS
Now we arrive at an instrument where understanding the difference between possible and practical becomes especially important.
Trumpets can be brilliant.
Powerful.
Warm.
Soft.
Aggressive.
Lyrical.
And, in the right hands, extraordinarily exciting in the upper register.
But this is exactly where a range chart can get an inexperienced arranger into trouble.
A chart may show us that a very high note is possible.
Fine.
But:
For whom?
A professional big band normally has clearly differentiated trumpet chairs, and the lead trumpet has a particularly demanding role.
The lead player is often responsible for the upper register and for defining much of the articulation, phrasing and energy of the brass section.
That player is a specialist.
So we should be careful about making statements such as:
“The trumpet can play this high.”
A more useful question is:
Which trumpet player am I writing this for?
And there is another factor:
One high note is not the same as living in the high register.
A strong player may comfortably produce an isolated upper-register note.
That doesn’t mean we should write sixteen bars continuously at that level.
Range and endurance are connected.
So are range and dynamics.
Range and articulation.
Range and tempo.
Range and what came immediately before.
The arranger has to consider the entire passage—not just its highest note.
Possible doesn’t automatically mean practical.
⸻
4. THE TROMBONES
The trombone presents us with another interesting problem.
Again, knowing the available notes is only the beginning.
The instrument is controlled partly through the movement of the slide.
That means two notes may both be perfectly comfortable individually while a rapid passage between them becomes considerably more demanding.
Tempo matters.
Articulation matters.
Slide movement matters.
The shape of the musical line matters.
So when writing for trombone, we need to ask more than:
Are all these notes within the range?
We also need to ask:
Does this line actually lie well on the instrument?
That is an important distinction.
Playable notes do not automatically create a playable line.
As with trumpet, register also changes character.
The middle register can give us a warm, full brass sound.
Moving upward can add brilliance, intensity and excitement.
Moving lower can add increasing weight.
And then we reach an instrument that deserves to be considered separately.
⸻
5. THE BASS TROMBONE
It is tempting to think of the bass trombone as simply:
Trombone 4, but lower.
That seriously underestimates the instrument.
The bass trombone can provide enormous depth and authority to the bottom of a brass section.
Used well, it can transform the weight of an entire voicing.
It can reinforce the bottom of the trombone section.
It can combine with baritone saxophone.
It can interact with bass.
And it can provide a powerful foundation underneath full brass writing.
But once again, the lowest possible note is not automatically the best note.
We need to understand where the instrument speaks naturally, where it produces its characteristic weight and what we are asking the player to sustain.
The bottom of the brass section is not simply a place to put the lowest available note.
It is part of the orchestration.
And now we’re beginning to move from range toward something much more interesting.
⸻
FROM RANGE TO COLOR
So far we have asked:
What can the instruments play?
But an arranger needs to ask another question:
What do I want them to sound like?
This is where instrumentation becomes truly exciting.
Because an instrument doesn’t have one sound.
Register changes the sound.
Dynamics change the sound.
Articulation changes the sound.
And with brass instruments, we have another powerful tool:
Mutes.
⸻
BRASS MUTES — CHANGING THE COLOR
A trumpet or trombone doesn’t have to play open all the time.
Different mutes can dramatically change its character.
Among the colors an arranger may choose are:
Straight Mute
Cup Mute
Harmon Mute
Plunger
Playing into a hat
Each produces a different effect.
And I think it’s important to understand what we’re doing here.
A mute isn’t simply a device for making an instrument quieter.
A mute is an orchestration choice.
A cup-muted brass passage has a completely different character from the same passage played open.
A Harmon-muted trumpet can create an intimate, concentrated and immediately recognizable color.
A plunger can introduce an expressive, almost vocal quality.
Playing into a hat can soften and alter the projection of the instrument.
So once again, our question shouldn’t be:
Which mute can I use?
It should be:
What sound does the music need?
⸻
NOW LET’S START MIXING THE COLORS
Once we understand the individual instruments, their registers and some of their available colors, another fascinating question appears:
What happens when we combine them?
A trumpet and trombone playing together don’t simply create “more brass.”
A flute combined with muted trumpets can create a completely different texture.
Clarinet combined with saxophones changes the character of the woodwind section.
Baritone saxophone and bass trombone can create considerable weight at the bottom of an ensemble.
Trumpets and saxophones can add brilliance to one another.
And the same musical idea can sound completely different depending on which instruments carry it.
Think about some possibilities:
Trumpets + Trombones
Power, brilliance and weight.
Saxophones + Brass (Tutti)
A fusion of reed and brass colors that can produce anything from warmth to enormous ensemble power.
Flute + Muted Trumpets
A lighter and more unusual color—very different from either sound alone.
Clarinet + Saxophones
A natural way of changing the character of a saxophone texture without completely abandoning its reed quality.
Baritone Saxophone + Bass Trombone
A powerful combination when we want additional weight at the bottom.
And these are only starting points.
Two instrumental colors combined can create a new color of their own.
This is one of the most fascinating parts of arranging.
But it also leads us into a subject that deserves considerably more space than we have left in this chapter.
⸻
BUT THAT ISN’T ORCHESTRATION—YET
We now know more about the instruments available to us.
We understand that a theoretical range is not the same as a practical range.
We know that register changes character.
We know that professional and specialist players allow us to extend what is realistically possible.
We know that woodwind doubling expands our palette.
And we know that mutes and instrumental combinations can dramatically alter color.
But we still haven’t answered one of the biggest questions an arranger faces:
Who should play what?
Suppose I have a melody.
Should five saxophones play it?
Trumpets?
Trombones?
Flute and muted trumpets?
Should I double it in octaves?
Should the sections play together?
Should one section carry the melody while another provides a background?
How should the notes of a chord be distributed through the ensemble?
And how do I turn the notes I hear in my head into a convincing big-band sound?
Now we’re talking about:
ORCHESTRATION.
And I don’t want to squeeze that subject into the end of this chapter.
It deserves a chapter of its own.
⸻
COMING NEXT
Chapter 6 — Orchestration: Who Plays What?
We now know our instruments.
We know more about their practical ranges, their registers, their strengths and their limitations.
We have also started exploring their colors.
Now we need to put them to work.
In Chapter 6, we’ll take the next step and ask:
Who plays the melody?
Who supports it?
Which instruments should be combined?
How should we distribute the notes?
When should sections blend—and when should they remain separate?
Voicing Techniques (e.g. "What is Drop 2 or Drop 2 & 4)
And perhaps most importantly:
How do we make the arrangement sound like the music we hear in our head?
Because instrumentation tells us what instruments we have.
Orchestration is deciding what to do with them.
See you in the next chapter.
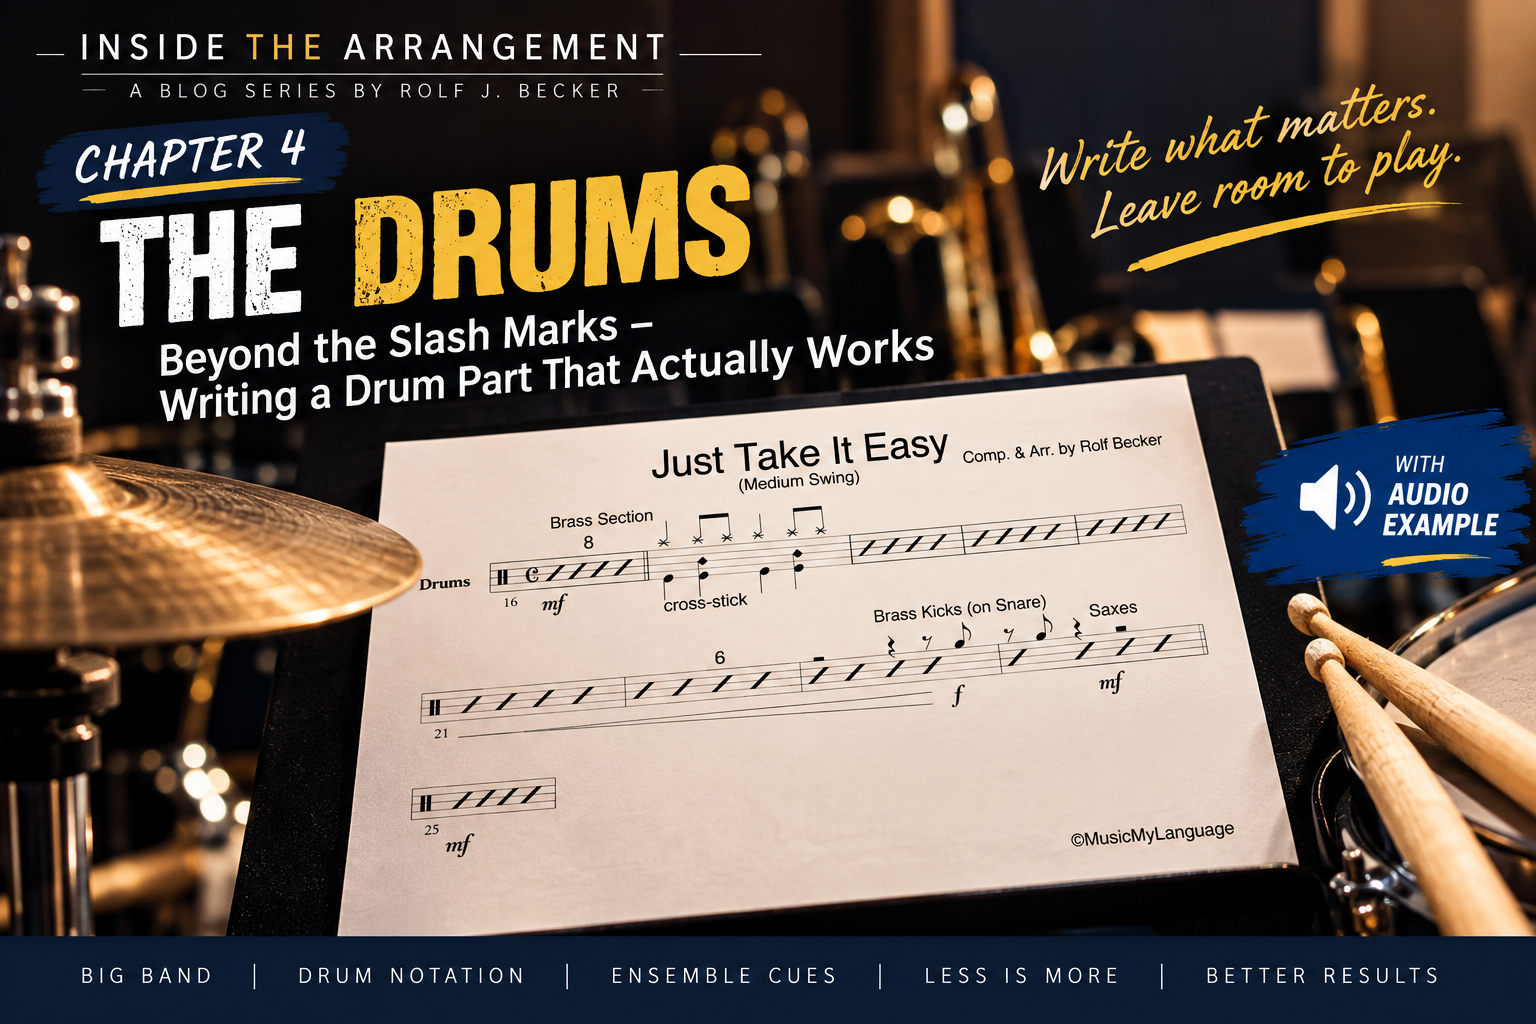
INSIDE THE ARRANGEMENT
A great drum part is more than slash marks. Discover how the right balance of ensemble cues, dynamics, written figures and creative freedom gives the drummer exactly what they need—and helps the entire big band perform more efficiently.
Chapter 4 — The Drums
Beyond the Slash Marks: Writing a Drum Part That Actually Works
A page full of slashes may tell the drummer where the measures are.
It doesn’t necessarily tell the drummer what the arrangement is doing.
At the other extreme, writing out every single hi-hat, ride cymbal, snare and bass drum note can be just as problematic.
So where is the right balance?
For me, a good drum part comes down to one basic principle:
Write what matters. Show what is happening.
Then leave room for the drummer to play.
Let’s return once again to Just Take It Easy and look at how I approach the drum part.
⸻
THE DRUMMER NEEDS A ROADMAP
When I write a big-band drum part, I don’t want to dictate every single bar.
A good drummer already knows how to play time.
I don’t need to tell an experienced player exactly where every ride-cymbal note belongs or prescribe every detail of the groove.
What the drummer does need to know is what is happening inside the arrangement.
For example:
Are the saxophones playing the melody?
Is there a trumpet solo?
Are the trombones playing important rhythmic kicks?
Is the full band playing a powerful tutti passage?
Are we entering the shout chorus?
Is there a break?
Is there an important dynamic change?
That information can completely change the way a drummer approaches a passage.
A simple written indication such as:
Saxes with Melody
or
Trumpet Solo
or
Shout Chorus
immediately gives the player musical context.
The drum part becomes a roadmap of the arrangement, rather than merely a collection of measures.
⸻
WRITE THE IMPORTANT FIGURES
There are moments when simply writing slashes is not enough.
If the trombones are playing important rhythmic kicks, I want the drummer to see those figures.
If the whole band is playing a powerful tutti passage, I want the rhythmic structure of that passage clearly represented in the drum part.
Why?
Because now the drummer can support, set up and reinforce what the ensemble is doing.
A trombone figure might suggest an appropriate response or setup on the bass drum.
A powerful tutti passage might call for a completely different approach, perhaps involving snare, cymbals and strong ensemble accents.
But there is an important distinction:
I am showing the drummer the band figure.
I am not necessarily orchestrating every drum stroke.
That is where good drum notation becomes particularly useful.
Example 4.1 — Drum Part with Ensemble Figures and Cues:
Look at Example 4.1.
Most of the part is deliberately left open. But whenever the drummer needs specific information, it appears on the page:
ensemble figures, instrumental cues, dynamics and even instructions about how certain figures should be played.
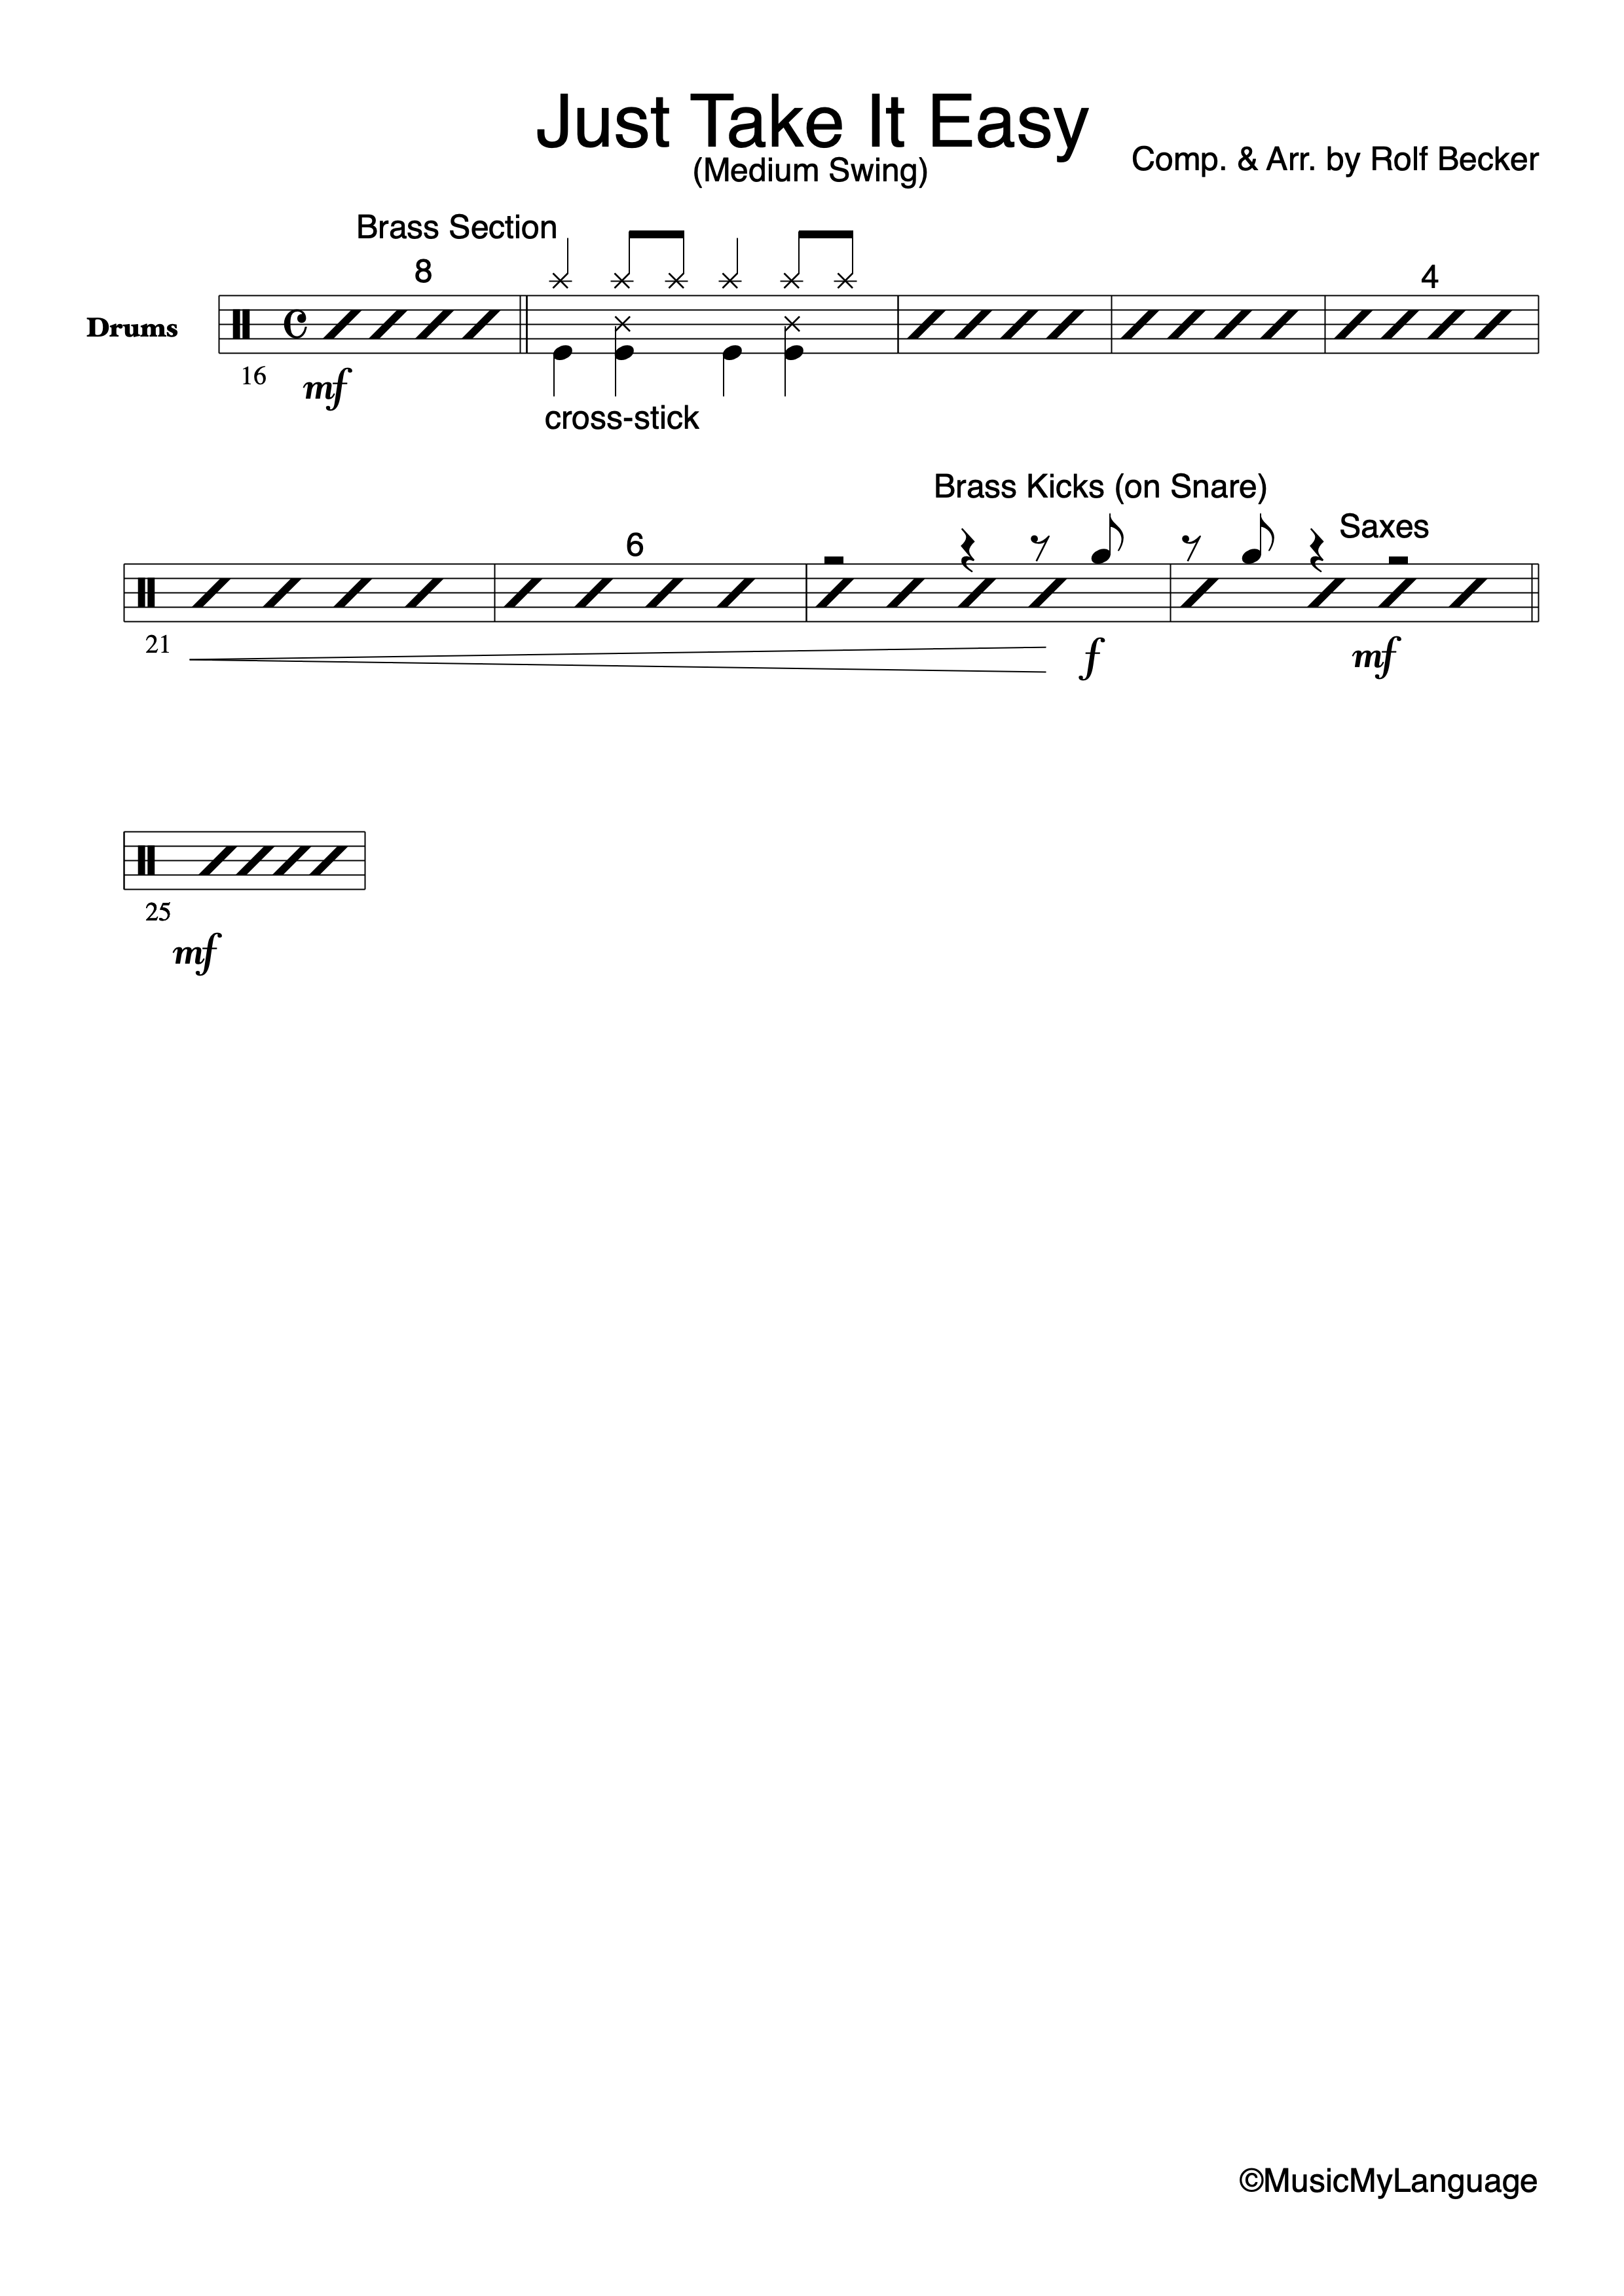
Drum Part with Ensemble Figures & Cues
The drummer isn’t being told what to play every second.
The drummer is being told what matters.
Audio Example 4.1 — Drum Part in Context:
Listen while following the notation above. Notice how the written figures provide the necessary ensemble information
while the open measures leave the drummer free to maintain the groove and shape the performance.
⸻
DON’T WRITE EVERYTHING
This is where arrangers can easily go too far.
If every bar contains fully written snare, bass drum, cymbal and hi-hat notation, we may actually make the part less useful.
The drummer’s attention becomes occupied with reproducing our notation rather than listening and reacting to the band.
And that can remove exactly what we want from a good rhythm-section player:
musical creativity.
Of course, there are situations where detailed notation is necessary.
If I need a very specific rhythmic effect, I write it.
If a fill must lead precisely into an ensemble entrance, I make that clear.
If a rhythmic figure is fundamental to the arrangement, the drummer should see it.
But if the drummer simply needs to play time for eight bars, why write eight bars of detailed drum notation?
Give the player the style, the musical context and the important information.
Then let the drummer play.
This is the same principle we encountered with piano and guitar in Chapter 3:
What does the player need?
Not:
How much can I possibly write on the page?
⸻
LESS NOTATION DOESN’T MEAN LESS INFORMATION
This distinction is important.
An uncluttered drum part should not be a vague drum part.
In fact, the best drum parts often contain less notation but more useful information.
That includes:
Dynamics.
Ensemble figures.
Important kicks.
Breaks and setups.
Changes of style or feel.
And written information about what is happening elsewhere in the band.
A drummer who sees Shout Chorus understands something that four bars of anonymous slash notation cannot communicate.
A drummer who sees Trumpet Solo immediately understands the musical hierarchy.
A drummer who sees an important brass figure can prepare for it before it happens.
The page should help the drummer understand the arrangement.
Less notation. More information.
⸻
BUT THE DRUMMER HAS TO BE ABLE TO READ IT
There is another side to this.
If we provide a carefully prepared drum part containing rhythmic figures, kicks, dynamics, cues and structural information, the drummer must be able to interpret that information.
Reading is therefore an important professional skill for a drummer working with written big-band arrangements.
And then, of course, jazz history gives us one rather spectacular exception.
AND THEN THERE WAS BUDDY RICH…
Buddy Rich was one of the most extraordinary big-band drummers in jazz history.
Yet Rich famously did not rely on conventional music reading in the way we would normally expect from a big-band drummer.
His extraordinary ears and musical memory allowed him to absorb complex arrangements by listening and retain an astonishing amount of musical information.
Henry Adler attempted to teach Rich to read music, but Rich’s performing and touring schedule repeatedly interrupted the process.
Musicians who worked with him also described his remarkable ability to hear an arrangement and remember its structure.
In other words, Buddy Rich could do something most musicians simply cannot.
So unless your drummer happens to possess Buddy Rich’s extraordinary musical memory…
give them a drum part they can read.
⸻
THE DRUM PART IS PART OF THE ARRANGEMENT
This brings us back to something that has been developing throughout Inside The Arrangement.
The rhythm section is not a collection of independent musicians.
It is one musical system.
The bass player needs to understand harmonic direction.
The guitarist needs to understand the rhythmic and harmonic framework.
The pianist needs to know where there is room to contribute—and where there isn’t.
And the drummer needs to understand what the entire band is doing.
That is why I don’t consider the drum part an afterthought that gets created after the “real” arranging is finished.
The drum part is part of the arrangement.
The clearer that part communicates the architecture of the music, the easier it becomes for the drummer to interact with the ensemble.
And the more efficiently the entire band can rehearse.
⸻
THE BALANCE
So what does a good big-band drum sheet actually need?
Not every note.
And certainly not just endless slash marks.
It needs the right information at the right moment.
Write the figures that matter.
Show the drummer what is happening in the band.
Include the dynamics.
Make the important kicks, breaks and transitions clear.
And wherever detailed notation is unnecessary, leave enough space for the drummer’s experience, musicality and creativity.
Because ultimately, a good drum part doesn’t tell the drummer how to play every beat.
It tells the drummer what matters.
Less notation. More information.
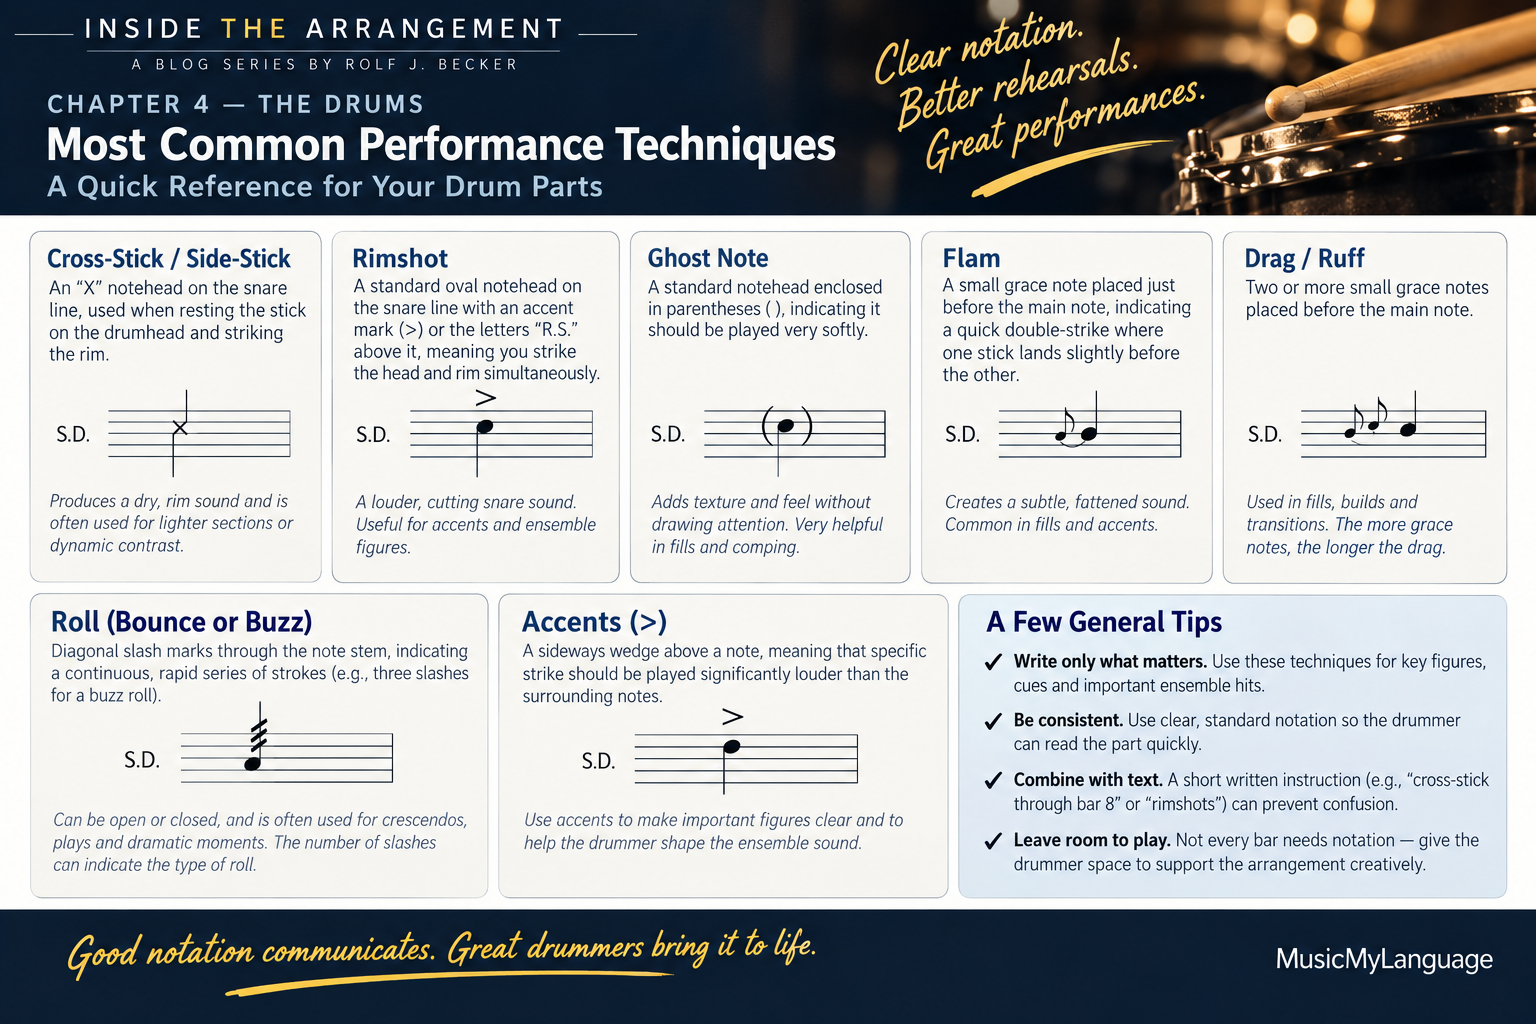
Most Common Performance Techniques
Coming Next
Chapter 5 — Brass & Woodwinds: What Can They Really Play?
We have built the foundation of the arrangement.
Bass, piano, guitar and drums have established the harmony, pulse, groove and rhythmic framework.
Now it’s time to turn our attention to the instruments that will give the arrangement much of its character, power and color:
The brass and woodwinds.
But before we start writing voicings and combining sections, there is a fundamental question every arranger needs to understand:
What can these instruments actually do?
What is the practical range of a trumpet, trombone or saxophone?
Which registers sound comfortable and natural—and which become demanding or potentially unreliable?
And just because a note exists in an instrument’s theoretical range, does that mean we should write it?
Then there is another essential consideration:
Not every register has the same sound.
A trumpet in its middle register has a very different character from a trumpet high above the staff.
A tenor saxophone can move from warm and full to increasingly powerful and penetrating as we change register.
And the same principle applies throughout the brass and woodwind sections.
Understanding range therefore isn’t only about knowing which notes are possible.
It’s about understanding what those notes will sound like.
And once we understand the individual instruments, another fascinating question appears:
What happens when we combine them?
Trumpets with trombones.
Saxophones with brass.
Flutes with muted trumpets.
Clarinet with saxophones.
And other options.
Different registers, doublings and instrumental combinations can transform exactly the same musical idea into completely different sounds and colors.
In Chapter 5, we’ll explore the practical possibilities and limitations of brass and woodwind instruments, their useful ranges, and how combining them begins to create the orchestral colors of a big-band arrangement.
Because before deciding what notes to write, an arranger needs to understand who is going to play them.
See you in the next chapter.
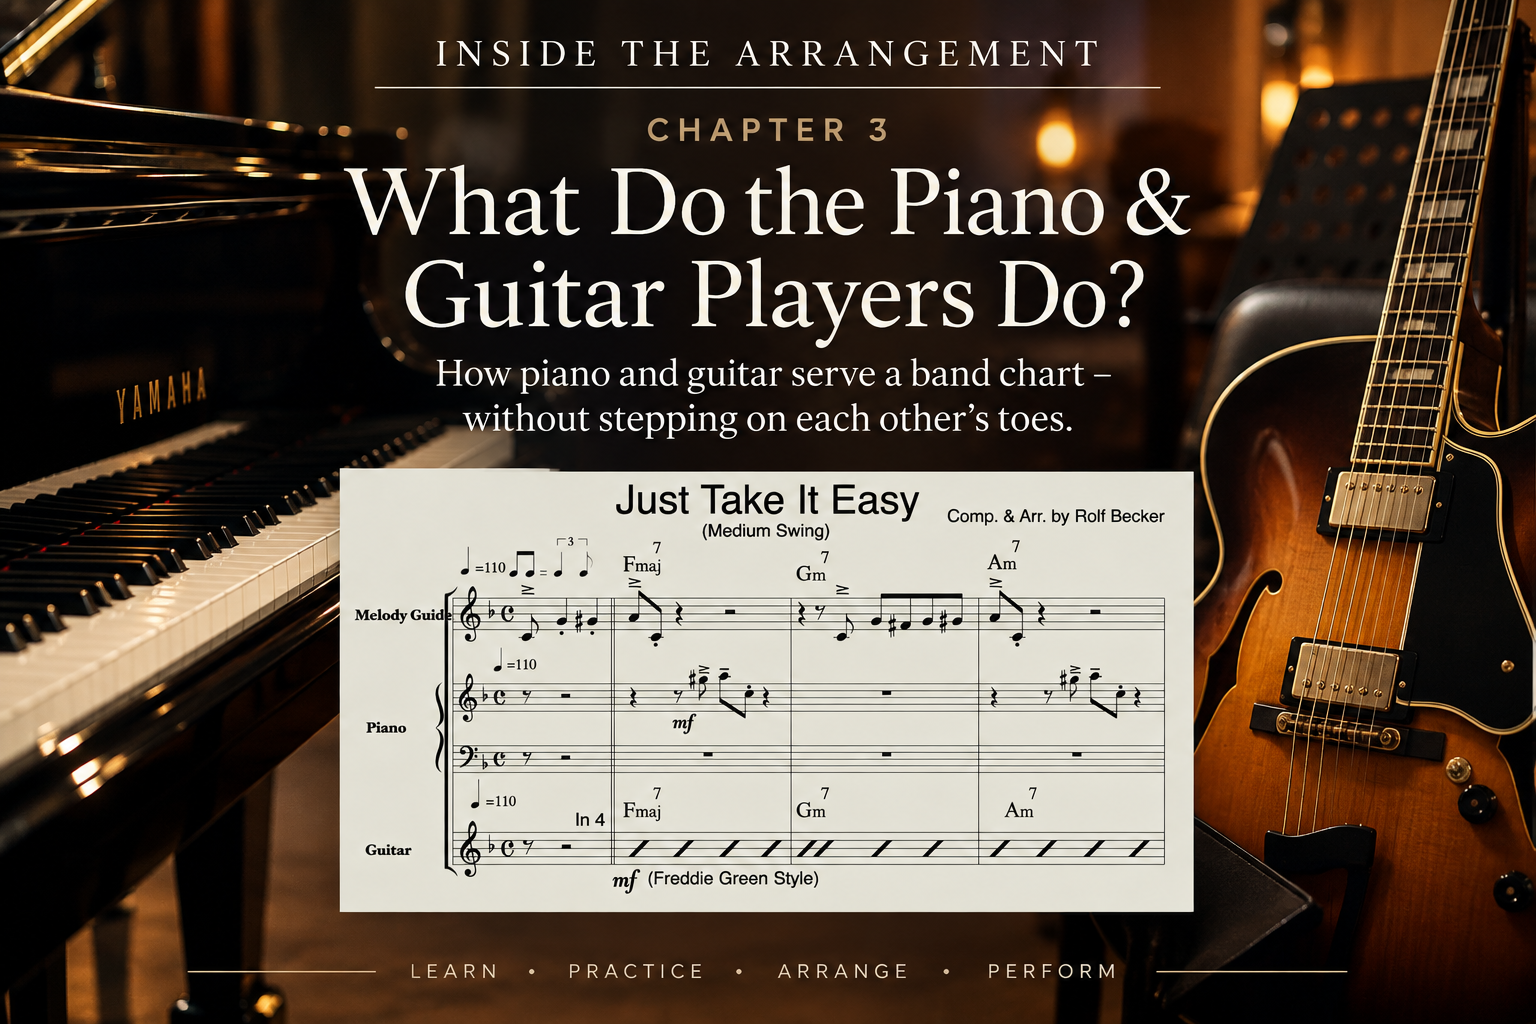
INSIDE THE ARRANGEMENT
How should piano and guitar work together in a Big Band arrangement without stepping on each other’s toes? In Chapter 3 of Inside The Arrangement, we explore their different roles, using Just Take It Easy as a practical example—from four-to-the-bar guitar comping to sparse piano fills, kicks and voicings that support the ensemble.
Chapter 3
What Do the Piano & Guitar Players Do?
How do piano and guitar serve a band chart and help create a satisfying, functional rhythm section—without stepping on each other’s toes?
The answer depends first on one very important factor:
The musical style of the arrangement.
For this chapter, let’s continue with Just Take It Easy and look at how I approached the piano and guitar parts step by step.
As I mentioned in Chapter 1, the inspiration for this composition came from Frank Foster’s Shiny Stockings, so wonderfully associated with the Count Basie Orchestra.
In that style, the roles of piano and guitar are beautifully clear.
The guitarist provides steady quarter-note chords, helping maintain the “In 4” flow together with the walking bass and drums.
The pianist does something very different.
Instead of constantly filling the harmony, the piano contributes occasional fills, accents and carefully placed chord kicks around the melody.
The result is not two chordal instruments competing for the same musical space.
It is two instruments performing different jobs inside the same rhythm section.
Audio Example 3.1 — Full Big Band: Piano & Guitar in Context
Listen to how piano and guitar perform different roles within the complete arrangement of Just Take It Easy. The guitar maintains the quarter-note swing flow, while the piano adds selective fills and chord kicks around the melody and ensemble figures.
Note: This audio example also accompanies the notation examples below.
⸻
A) THE PIANO
When writing the piano part, I normally think first about how much freedom the pianist should have.
There are three practical approaches.
Option 1 — Guide the Professional Player
For an experienced professional pianist—especially when performing a new or unfamiliar composition—I strongly recommend a two-stave piano part.
The upper stave can contain:
a melody guide
important woodwind or brass figures
fills and kicks that the pianist needs to know about
Example 3.1 —Melody Guide including Ensemble Cues & Piano Lead Sheet
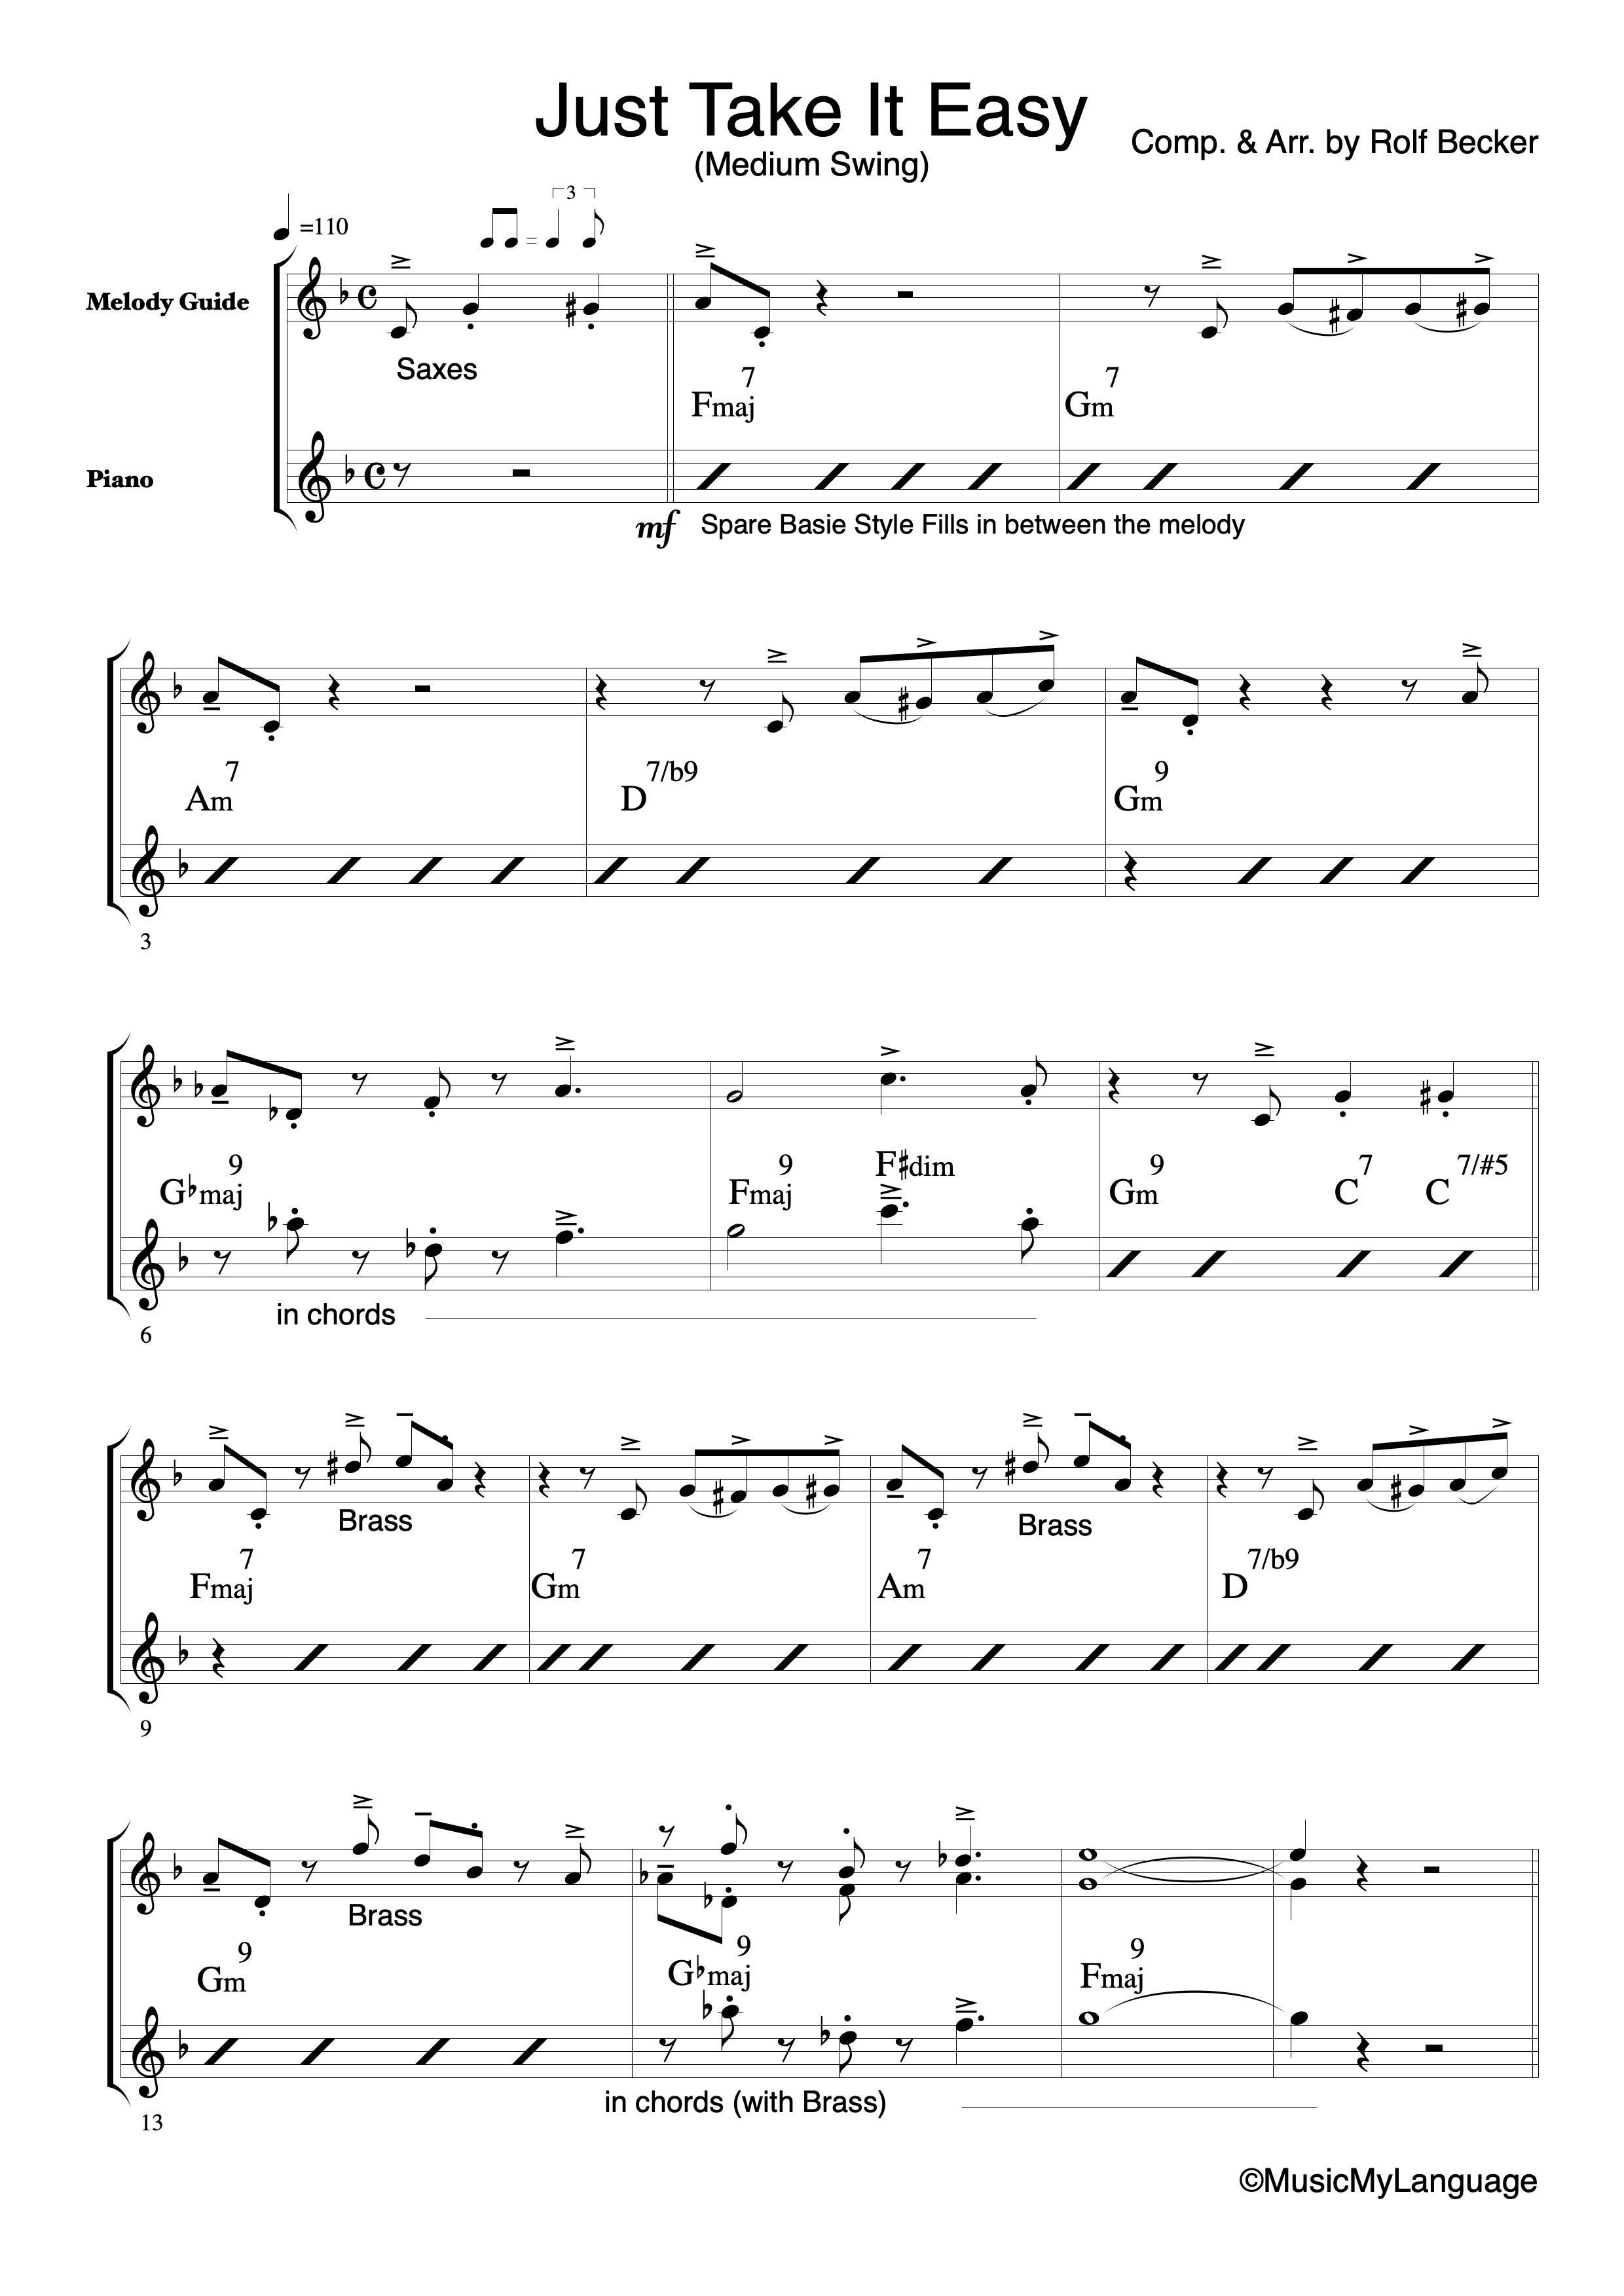
Example 3.1 — Piano Melody Guide and Ensemble Cues
The lower stave can then function more like a chord sheet.
This gives the pianist enough information to understand what is happening in the arrangement while still leaving room to create appropriate fills and chord kicks
For me, this is an important principle.
I don’t want to dictate every note if the player already knows how to create an effective jazz piano part.
I want to provide the information the player needs.
Then I leave room for musicianship.
Important: Anticipated notes should use the chord of the following beat. See, for example,
the anticipated note on beat 4+ in bar 7, leading into bar 8.
⸻
Option 2 — Write It Out
For student or developing ensembles, I would normally take a different approach.
The upper stave still provides the melodic and ensemble information.
But on the lower stave, I can write out the fills, voicings and rhythmic chord figures.
Example 3.2 — Melody Guide & Fully Written Piano Part

Example 3.2 — Melody Guide & Fully Written Piano Part
This removes unnecessary uncertainty and helps the pianist handle the chord progression correctly.
In this situation, the piano part serves two purposes:
It tells the player what to play, while also showing how a functional piano part can be constructed.
I still include the chord symbols above the Melody Guide, even when the piano part is fully written out.
There are two reasons for this:
First, for educational purposes, I want the pianist to understand which chords are actually being played rather than simply reading the written notes.
Second, if a young player is already familiar with most of the chord symbols, they can gradually begin to connect the written voicings with the underlying harmony.
This helps develop harmonic awareness and, eventually, gives the pianist more freedom to interpret the part rather than relying exclusively on the written notation.
⸻
Option 3 — Combine Freedom and Direction
The third possibility is often particularly useful with professional players.
Some passages can be left with chord symbols and freedom.
Other fills or chord figures may be important enough that I want them played exactly as written.
So the piano part becomes a combination of:
written material + chord symbols + ensemble information
Example 3.3 — Melody Guide & Combined Written and Open Piano Part

Example 3.3 — Melody Guide & Combined Written and Open Piano Part
This gives me control where the arrangement requires it, without unnecessarily restricting the pianist everywhere else.
⸻
B) THE GUITAR
The guitar has a different function in Just Take It Easy.
In this Basie-influenced swing style, the guitarist’s main job is to support the quarter-note flow.
Again, there are several ways to notate this.
Option 1 — The Chord Sheet
For an experienced guitarist, a single-stave chord part is normally sufficient.
But I don’t like giving the guitarist only chord symbols with no information about the arrangement.
The part should also indicate what is happening around the player:
saxes carrying the melody
trombones in the background
brass figures
shout chorus
significant breaks
important rhythmic hits
Example 3.4 — Guitar Chord Part with Arrangement Cues
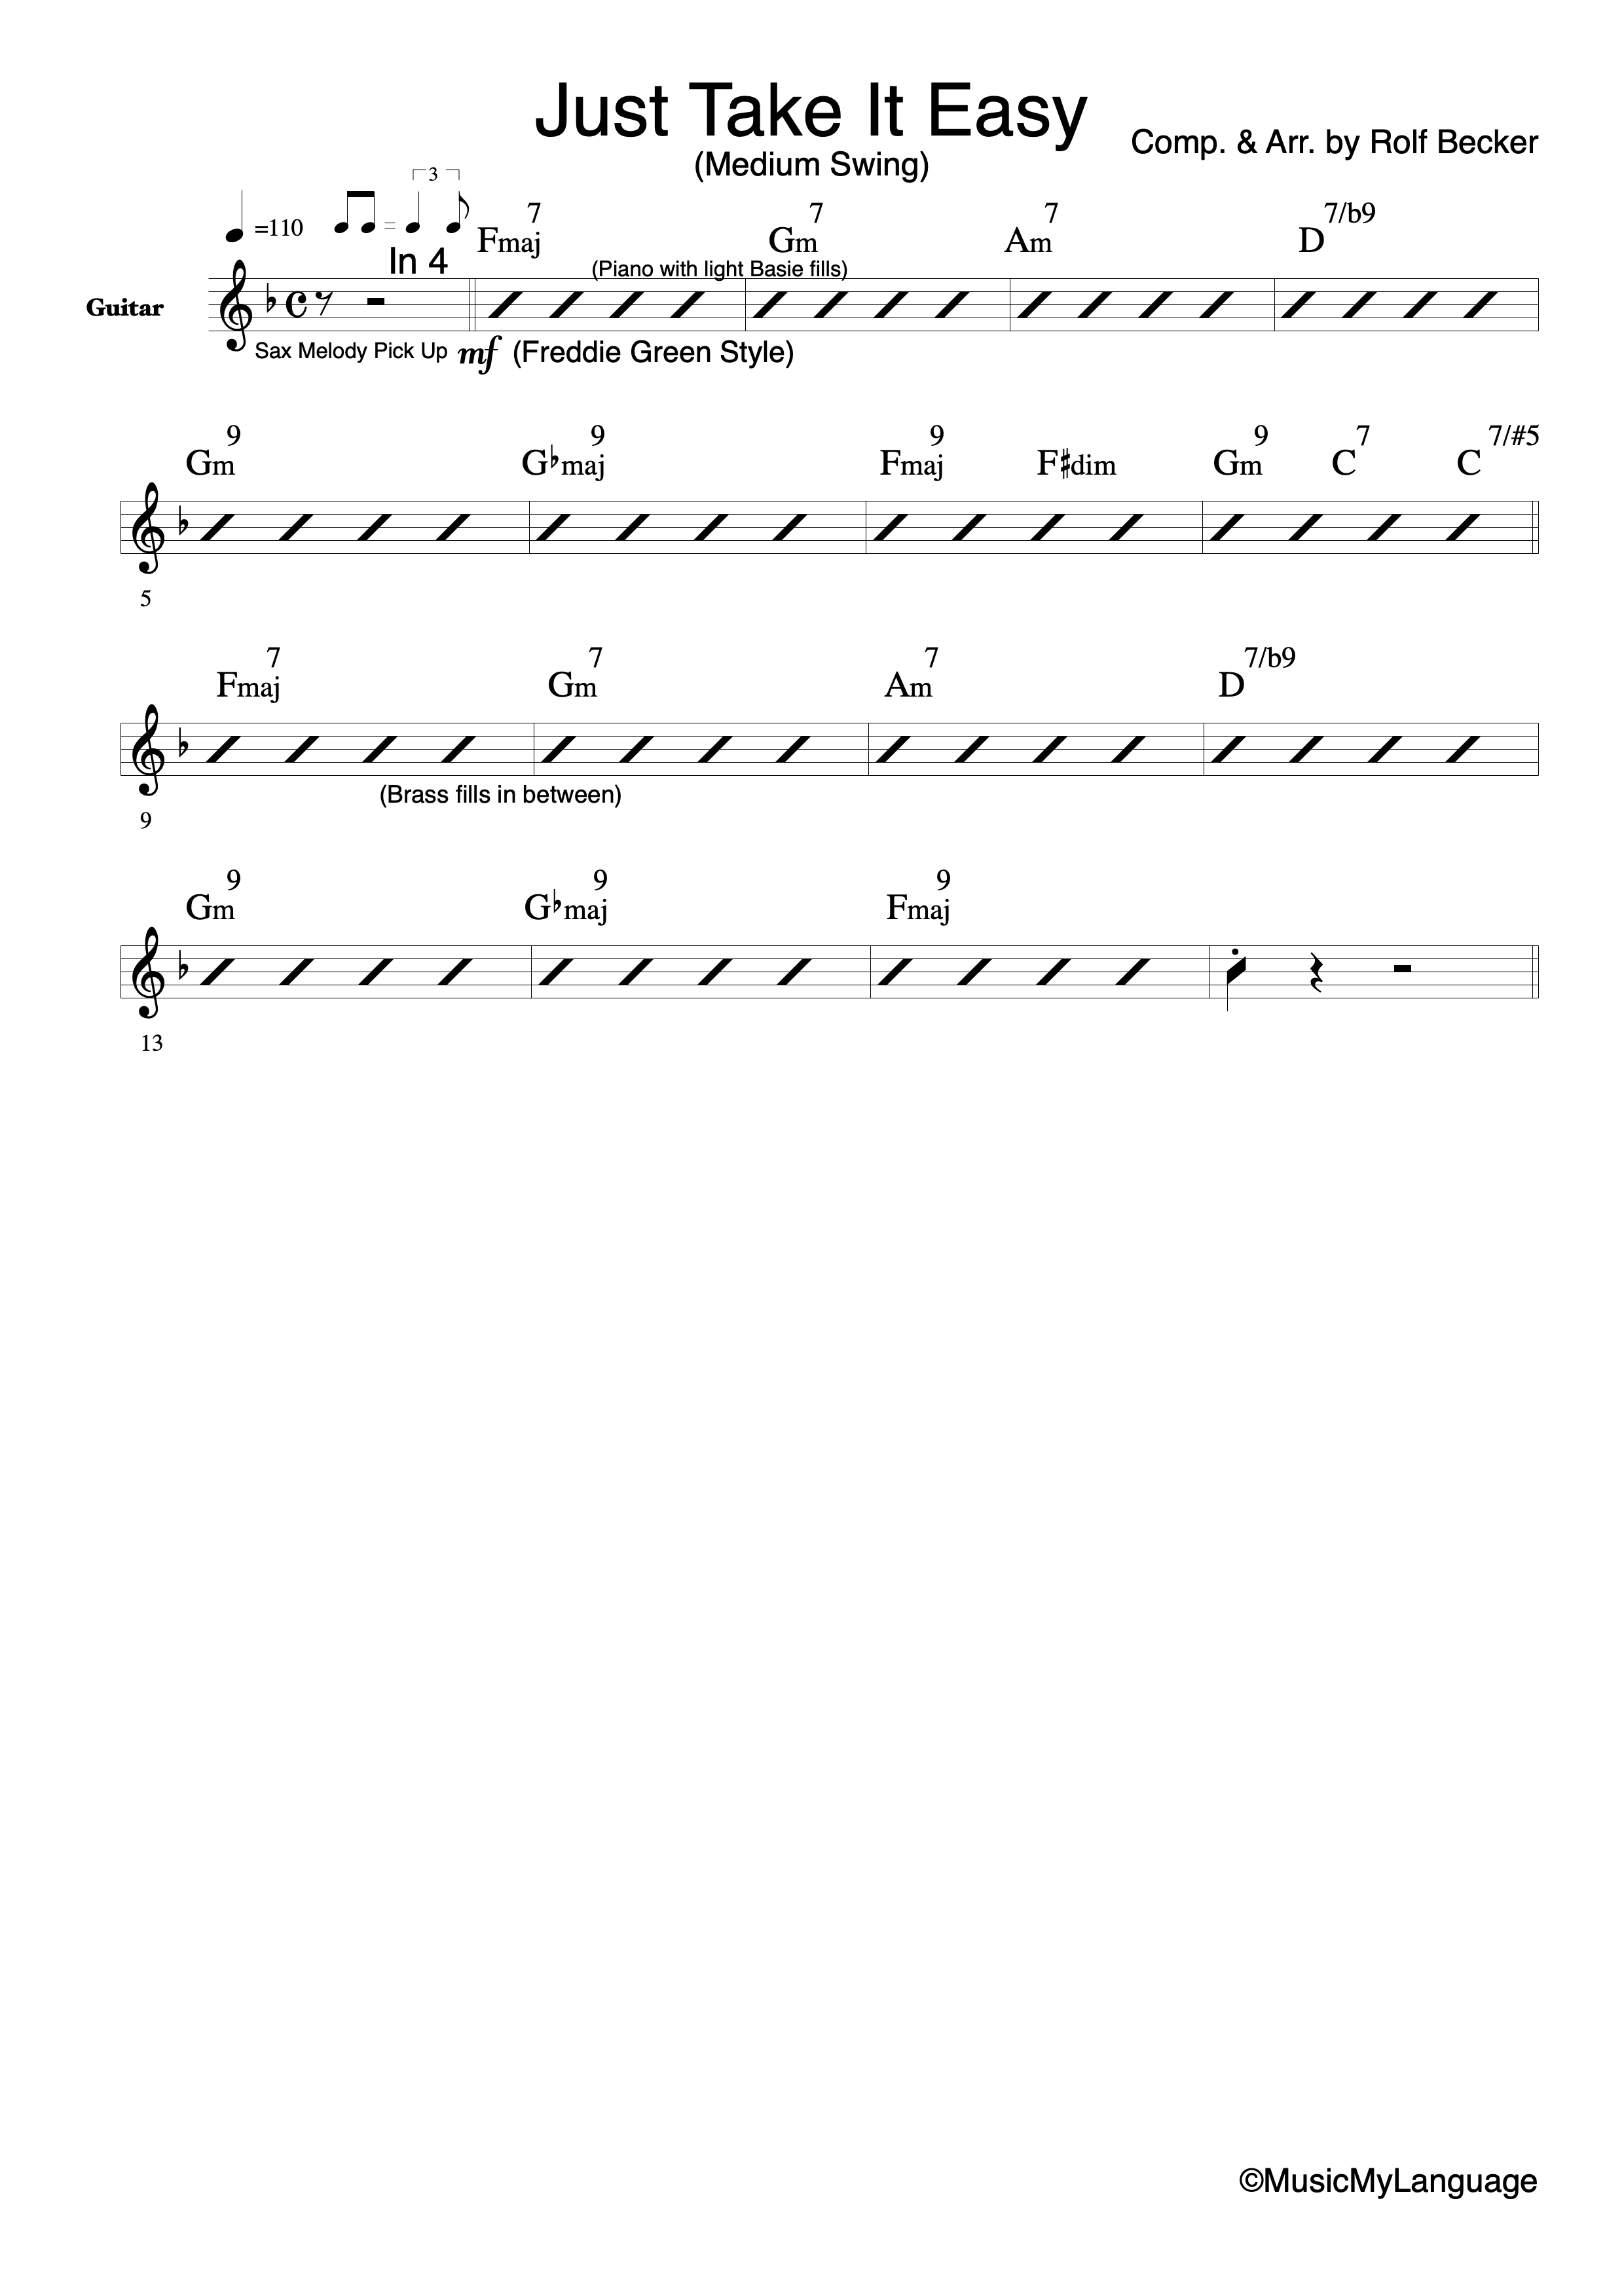
Example 3.4 — Guitar Chord Part with Arrangement Cues
This allows the guitarist to understand not only what chord to play, but also what role the guitar is playing at that moment.
That is much more useful.
⸻
Option 2 — Guitar Doubles the Melody
Sometimes I want the guitar to become part of the orchestration itself.
For example, the guitar may double the melody to create a particular color.
Example 3.5 — Guitar Doubling the Melody
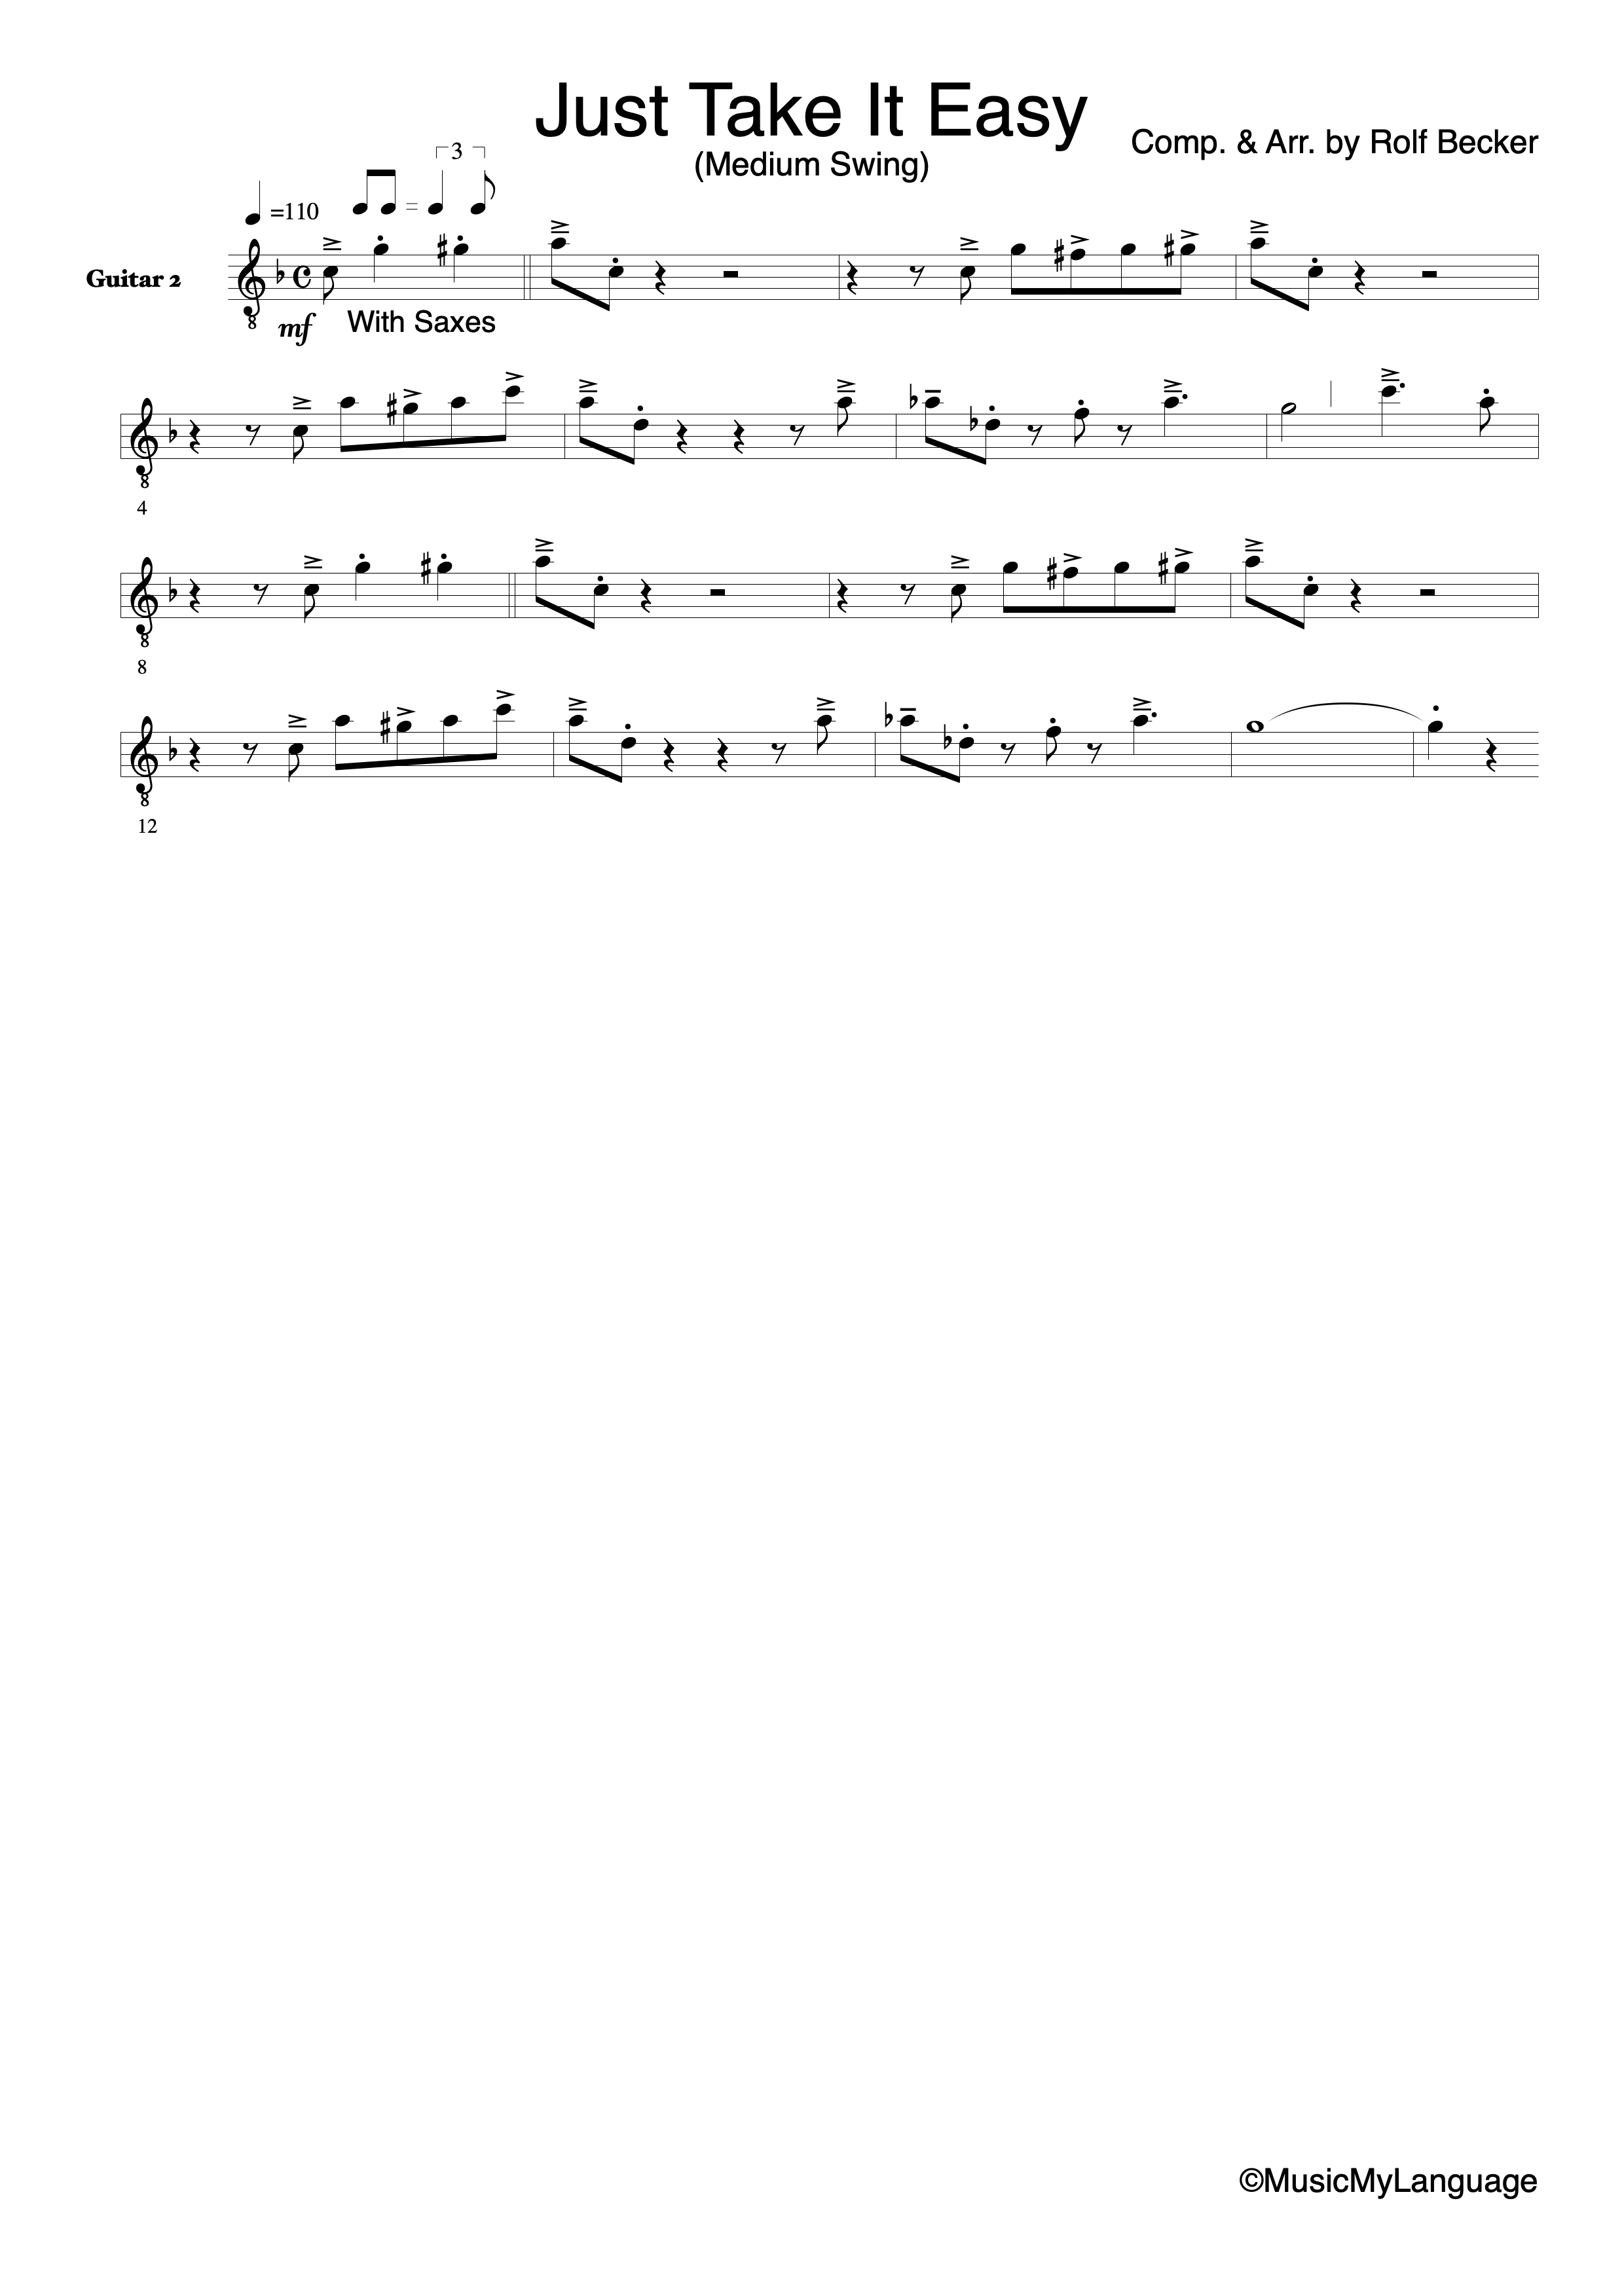
Example 3.5 — Guitar Doubling the Melody
IMPORTANT : The Guitar Sounds One Octave lower than written
Audio Example 3.2.1— Guitar Melody Doubling (With Saxes Only)
Listen to the example without the rest of the band - just Guitar doubling the Sax Section
Audio Example 3.2.2— Guitar Melody Doubling (With Full Orchestra)
Now you can probably hear the Guitar, playing the melody even with the full Big Band
In a published arrangement, I would consider providing both possibilities where appropriate.
Not every guitarist is equally comfortable with sight-reading fully notated melodic material, while others may welcome it.
Giving the player a practical alternative can make the arrangement considerably more usable.
⸻
Option 3 — Combine Melody and Chords
Example 3.6 — Melody Guide including Ensemble Cues & Guitar Lead Sheet

Example 3.6 — Melody Guide including Ensemble Cues & Guitar Lead Sheet
At first glance, this two-stave format looks very similar to Option 1 for the piano: the melody and important ensemble cues provide the guitarist with a clear picture of what is happening in the arrangement.
There is, however, one important difference.
Unlike the piano version, the guitar part does not contain written-out piano-specific chord voicings, fills, or rhythmic figures. Instead, the second stave is reserved exclusively for information relevant to the guitarist.
This keeps the part clean and practical while still allowing the guitarist to see the musical context of the arrangement and understand exactly how the guitar fits into the ensemble.
Again, the decision is based on what the music requires.
Not on the idea that one notation method is automatically better than another.
⸻
What If There Is No Guitarist?
This is a very practical question.
Many ensembles simply don’t have a guitarist.
In that case, the pianist normally needs to take a slightly more active harmonic role.
But that does not necessarily mean playing constantly.
In Just Take It Easy, the walking bass and drums already provide a strong “In 4” foundation.
The pianist can therefore add enough chordal support to maintain the harmonic texture without trying to imitate the guitar part note for note.
All three piano-part approaches discussed above can still work.
The important thing is to understand what has disappeared from the texture—and then decide whether the piano actually needs to replace it.
⸻
Do Piano and Guitar Always Need to Play Together?
No.
And this may be one of the most important lessons in this chapter.
Just because both instruments have chord symbols does not mean both instruments need to play at the same time.
Sometimes the guitar should carry the pulse while the piano leaves space.
Sometimes the piano should provide a fill while the guitar keeps its part simple.
Sometimes one instrument should stop completely.
Space is part of the arrangement.
If both instruments constantly play full chords, rhythmic figures and fills, even perfectly correct notes can create a rhythm section that sounds cluttered.
So the question is not:
Can both instruments play here?
The better question is:
Does the music need both instruments here?
⸻
A Word About Piano Voicing
Chord voicing is a large subject in itself.
Shell voicings, guide tones, rootless voicings, extensions, alterations, drop voicings and many other approaches can dramatically change the sound of a jazz piano part.
That topic would take us far beyond the purpose of this chapter.
There are excellent dedicated resources available for pianists who want to explore voicings in greater depth. For example,
Piano With Jonny presents a structured overview including shell voicings, guide tones, rootless voicings, block chords, drop-2 voicings and quartal voicings.
Additional useful resources include the Jazz Tutorial guides and J.B. Dyas’s Jazz Piano Voicings
For Inside The Arrangement, however, our focus is different.
We are asking:
How does the piano function inside the arrangement?
And that is an arranger’s question.
⸻
The Bigger Picture
Piano and guitar are both harmonic instruments.
But that does not mean they should perform identical jobs.
In Just Take It Easy, the guitar helps establish the quarter-note swing flow.
The piano adds color, punctuation and occasional fills.
The bass connects harmony and pulse.
The drums complete the rhythmic framework.
Each instrument contributes something different.
That is why the rhythm section works.
Good rhythm-section writing is not about giving every player something interesting to do every second.
It is about giving each player the right job at the right moment.
And sometimes the most effective thing a musician can play is:
nothing.
⸻
Coming Next
Chapter 4 — The Drums: Why Is Detailed Drum Notation So Important?
The bass establishes direction.
Piano and guitar shape the harmonic and rhythmic framework.
But there is one instrument that can change the entire character of the arrangement almost instantly:
The drums.
How much should an arranger actually write?
Which ensemble figures should appear in the drum part?
When should the drummer follow the written material—and when should the arranger leave room for interpretation?
And why can a carefully prepared drum part make rehearsals dramatically more efficient?
In Chapter 4, we’ll look at drum notation step by step.
See you in the next chapter.
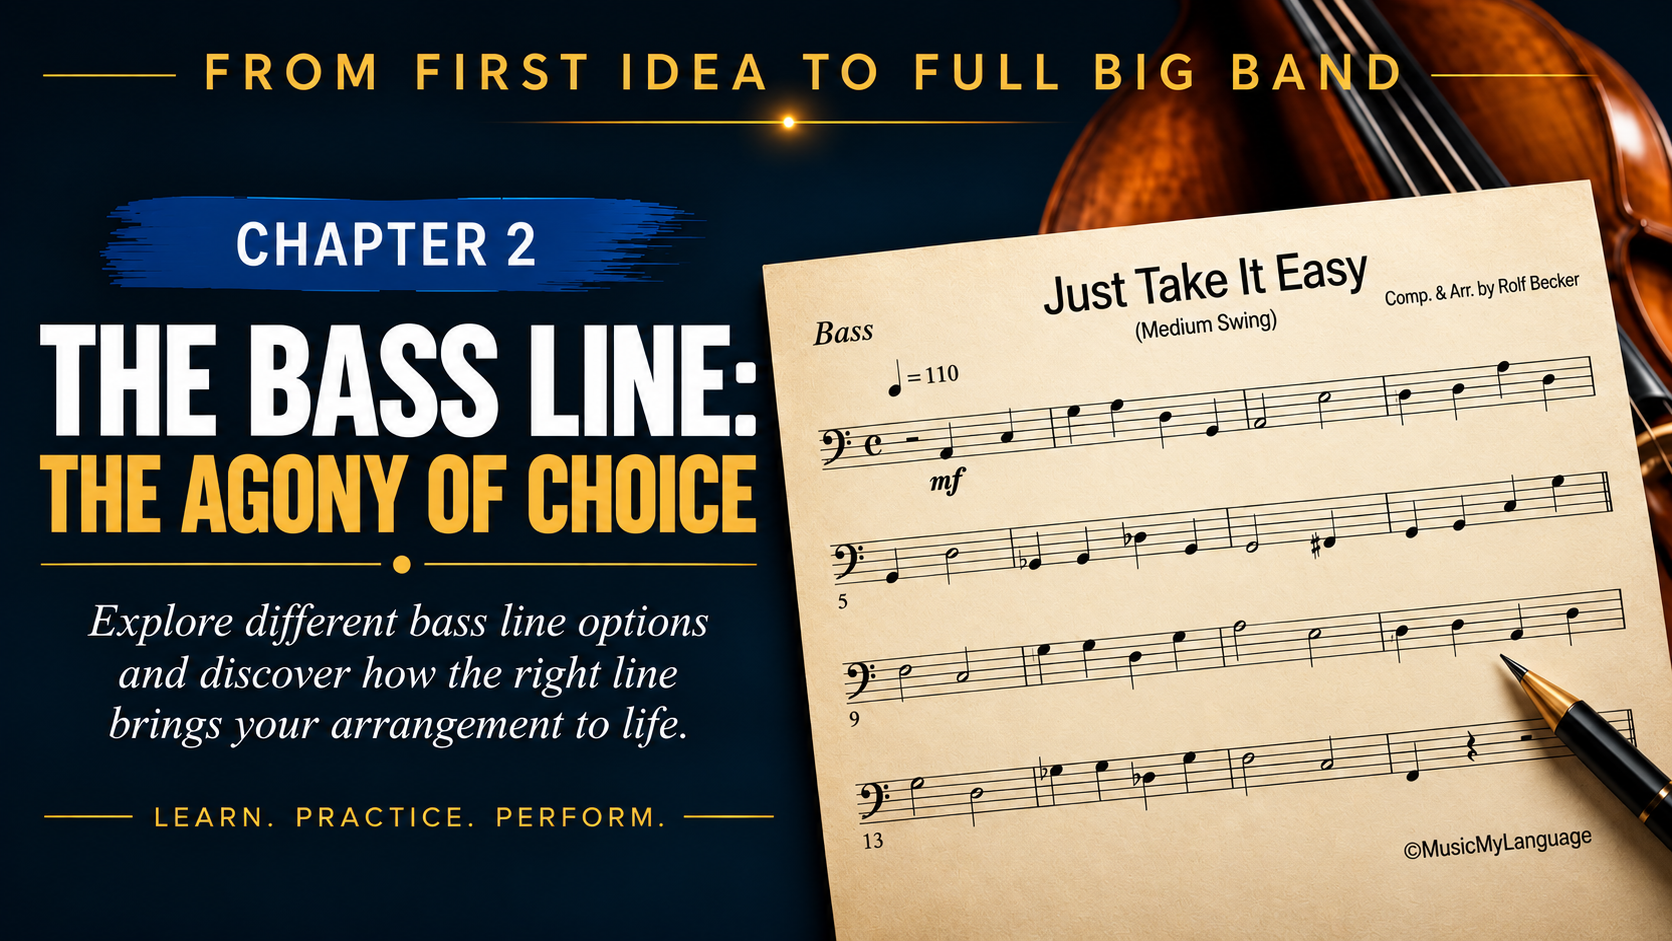
Inside The Arrangement
What makes a great bass line? Explore the essential choices between “In 2” and “In 4,” discover basic walking bass patterns, and learn how the bass works with the rhythm section to bring an arrangement to life. Includes practical sheet music and audio examples.
Chapter 2
The Bass Line: Choose the Right Bass Line and You’re Golden
You can write a great melody. You can find beautiful chords. You can even have a killer drum groove.
But choose the wrong bass line — and somehow the whole arrangement just doesn’t sit right.
The bass is one of the most important links between harmony and rhythm.
It supports the chord progression, locks in with the drums, gives the music direction and, perhaps most importantly, helps determine how the entire arrangement feels.
And there isn’t just one way to do it.
As a composer or arranger, you have several basic approaches to choose from.
In this chapter of Inside The Arrangement, I’ll introduce some of the most useful ones, accompanied by audio examples and sheet music,
so you can both see and hear the difference.
But before we get to the notes, there is one important principle:
A great bass line doesn’t work alone.
The bass player needs solid support from the other rhythm-section players. Drums, piano and guitar all contribute to the groove and harmony.
When they work together, the bass line doesn’t merely support the melody - it helps carry the entire arrangement.
So, let’s get started.
⸻
1. Playing “In 2”
When musicians say that the bass is playing “in 2,” it basically means that the bass emphasizes two notes within a 4/4 measure,
usually giving the music a spacious two-beat feeling.
It is simple - but simple does not mean boring.
There are several ways to create an effective in 2 bass line.
Root notes only
The simplest version is to play the root of the chord on beats 1 and 3.
This clearly establishes the harmony and gives the rest of the rhythm section plenty of space.
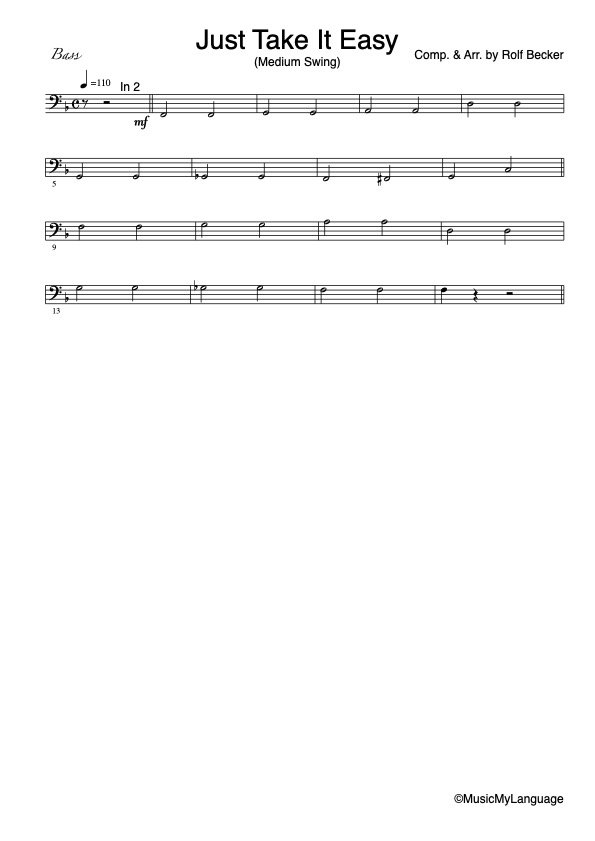
For better audible results please use headphones / proper in ears
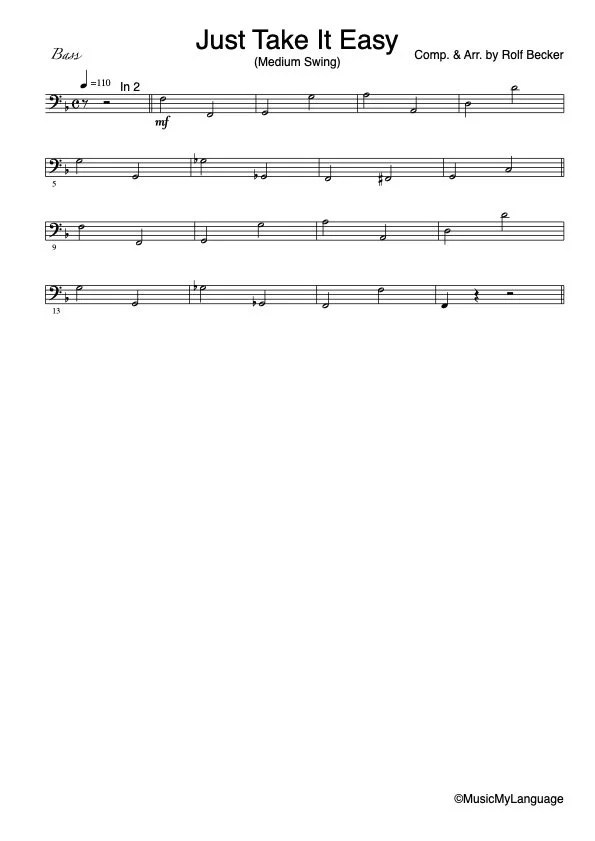
Root notes — changing octaves
Now take the same basic idea but alternate between different octaves of the root.
The harmonic information hasn’t changed, but the line immediately has more movement.
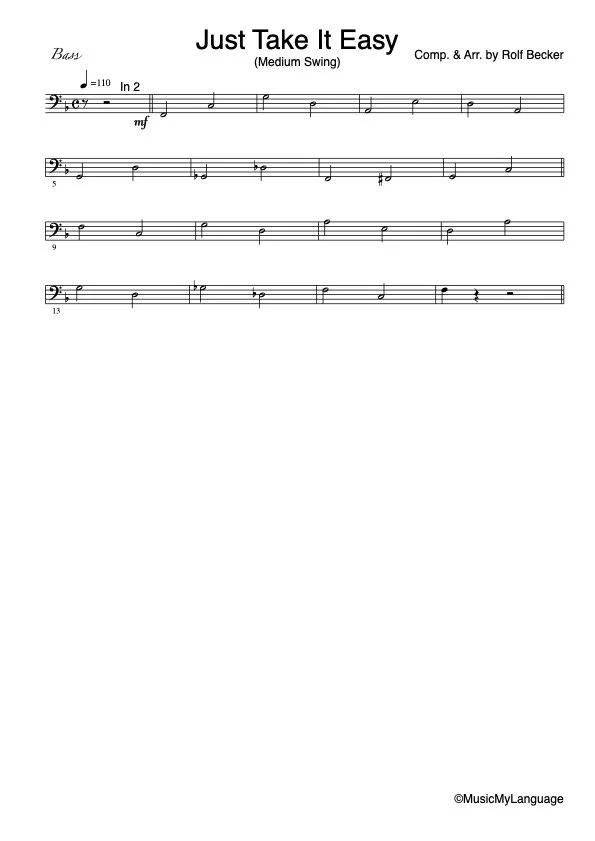
Root and fifth
Another classic approach is to alternate between the root and fifth of the chord.
It is still harmonically simple, but the fifth adds another dimension and creates a stronger sense of motion.
Root & Fifth
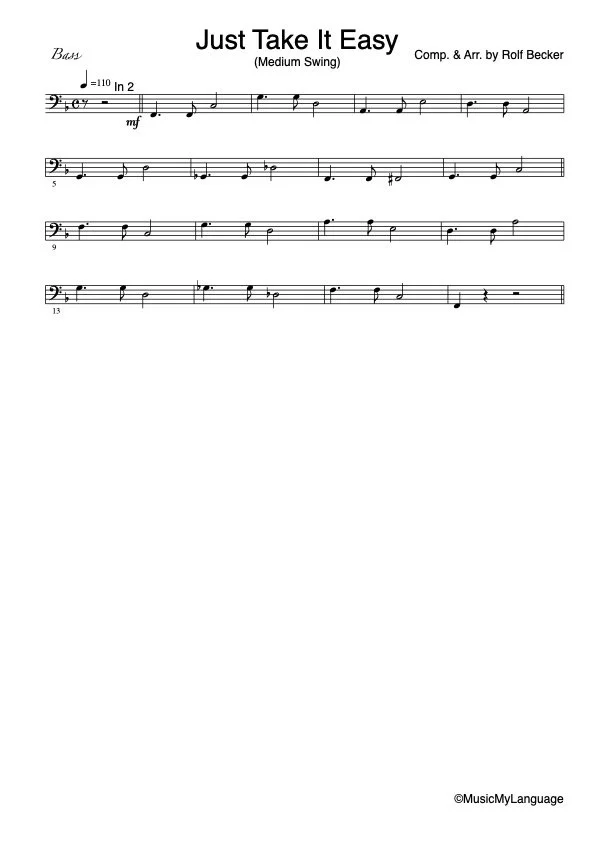
Root and fifth — with a little rhythmic movement
We can make the same idea more interesting by introducing a small rhythmic phrase around beats 1 and 2.
Now the bass is beginning to do more than simply state the harmony. It starts contributing its own rhythmic character to the arrangement.
Mixing “In 2” and quarter-note movement
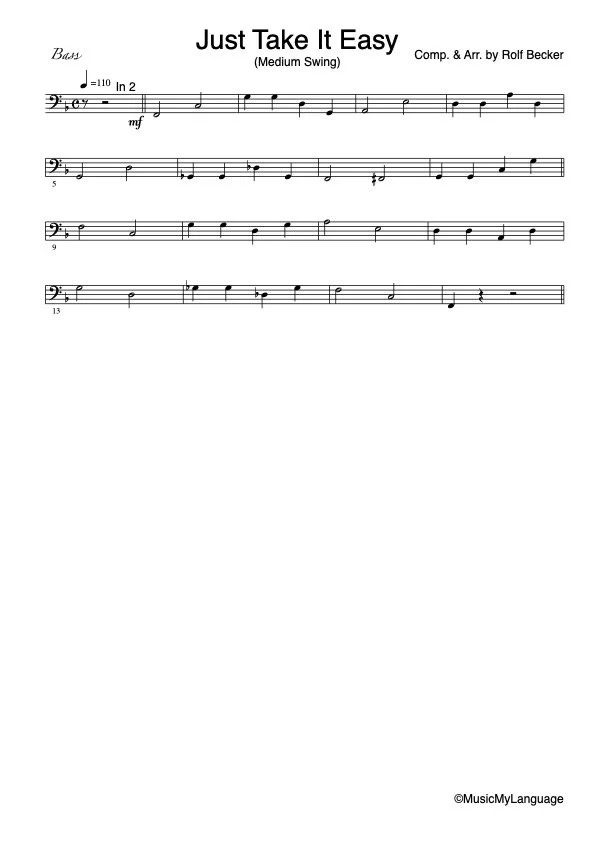
Here is another useful variation.
Instead of maintaining exactly the same pattern in every measure, try a two-bar phrase:
Bar 1: two half notes
Bar 2: four quarter notes
The bass is still creating an overall in 2 character, but the second measure introduces forward motion.
This is a very simple arranging device — and a very effective one.
⸻
2. Playing “In 4” — The Walking Bass Line
Now things start moving.
When the bass plays four quarter notes in a 4/4 measure, we call this playing “in 4.”
In jazz, this is commonly associated with the walking bass line.
And this is where understanding harmony becomes particularly important.
A good walking bass line shouldn’t simply play the root four times:
1 – 1 – 1 – 1
That would establish the chord — but after a while it would become rather boring.
Instead, the bass player uses chord tones, scale tones and passing notes to create a melodic line that connects one chord to the next.
This is also why the bass player needs a rhythm section that clearly supports the correct chords and chord progression.
The better the harmonic foundation, the more naturally the bass can create movement through the harmony.
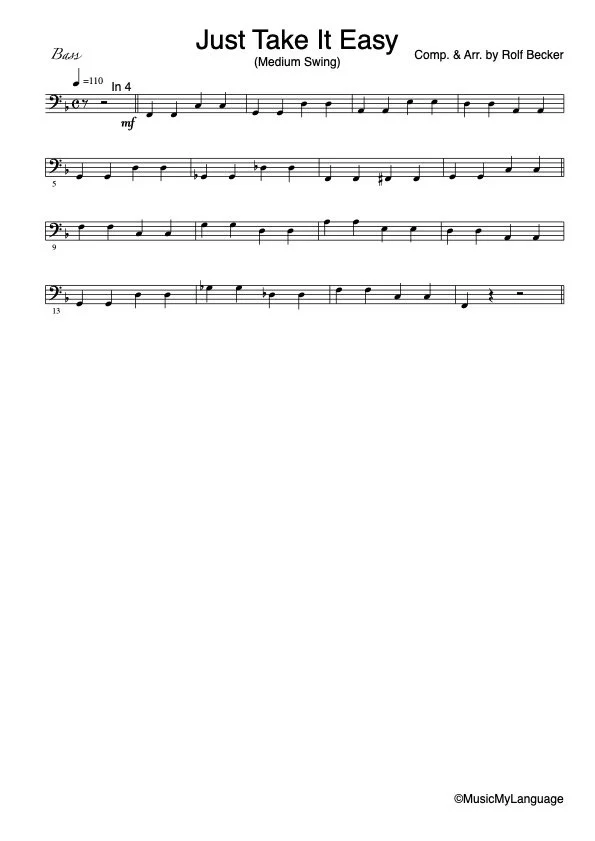
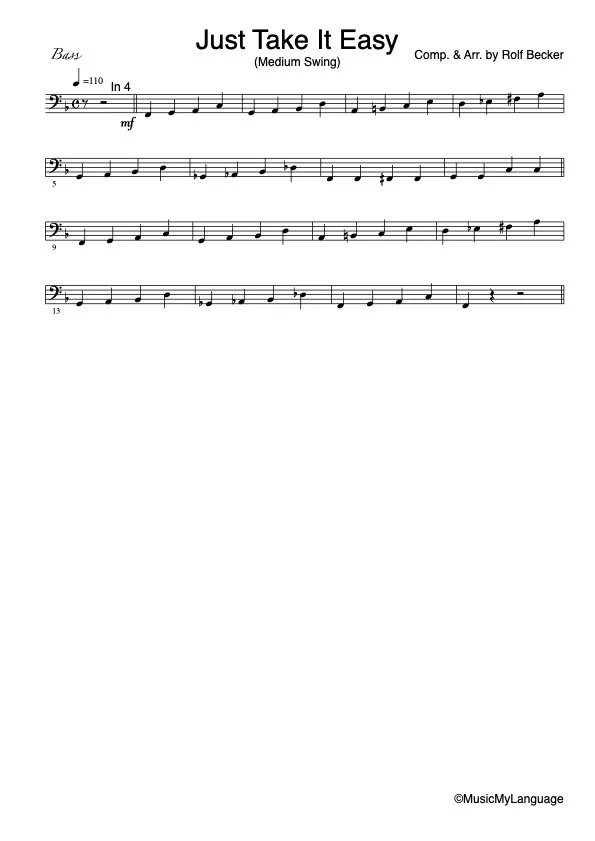
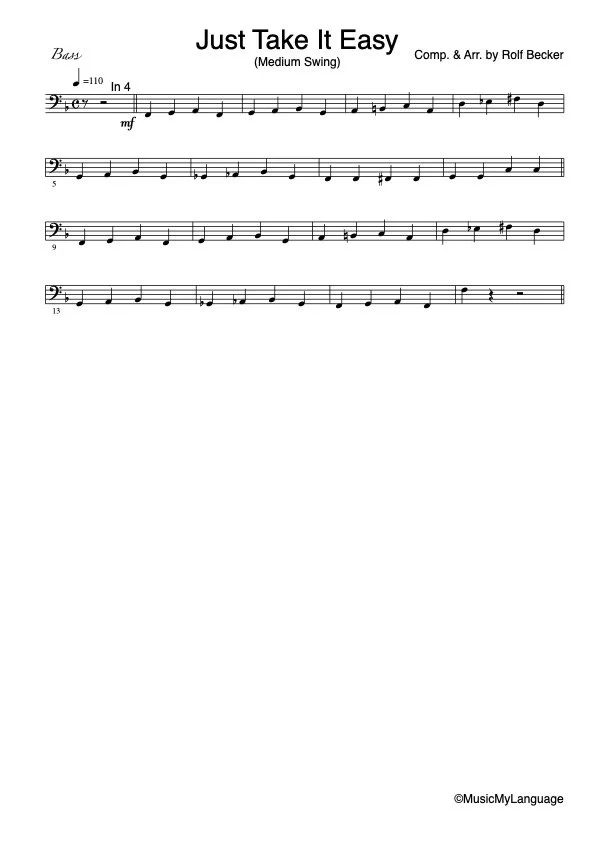
Here are a few basic patterns to get started.
1 – 1 – 5 – 5
Root – Root – Fifth – Fifth
A very straightforward pattern and a good starting point for understanding the sound of four quarter notes against the harmony.
1 – 2 – 3 – 5
Root – Second – Third – Fifth
Now we are beginning to hear the line as something melodic rather than simply a sequence of chord root & fifth.
1 – 2 – 3 – 1
Root – Second – Third – Root
Another simple way of moving through the scale while keeping the root as a strong reference point.
1 – 7 – 6 – 5
Root – Seventh – Sixth – Fifth
Here the line moves downward, creating a completely different sense of direction.
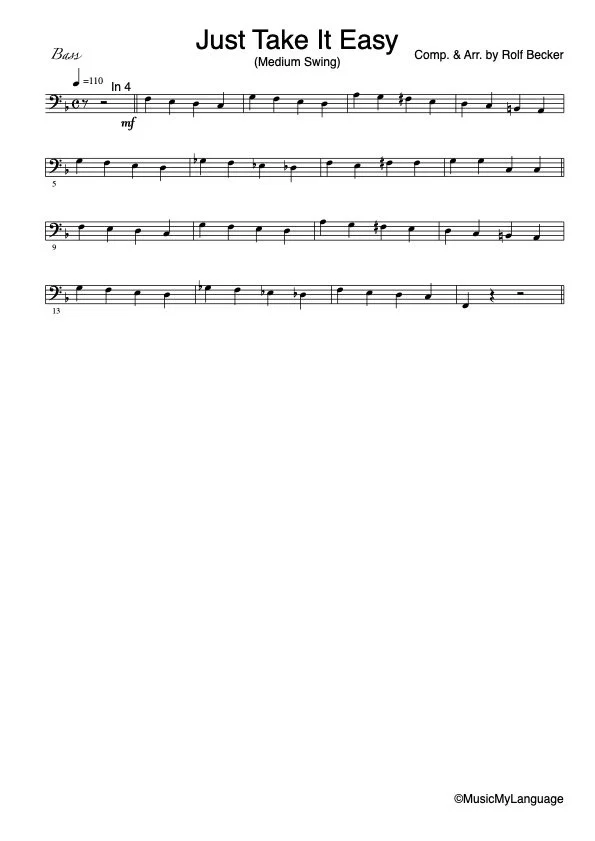
These aren’t rules.
Think of them as building blocks (or pattern).
Once you understand what they do, you can combine them, change their direction and adapt them to the chord progression.
⸻
What If the Chord Lasts Longer?
This is where things become even more interesting.
Suppose one chord lasts for two complete measures.
Playing exactly the same four-note pattern twice isn’t your only option.
You can create a longer melodic journey through the harmony.
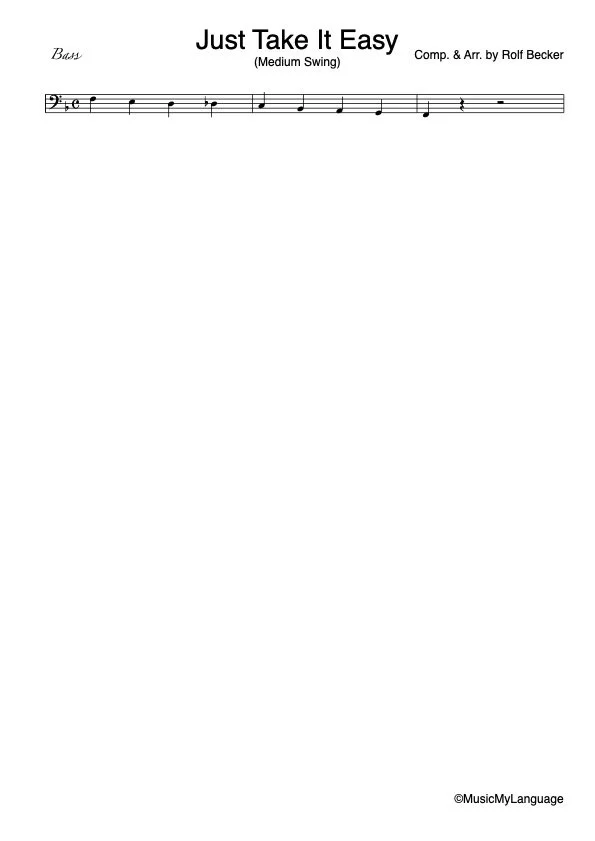
For example:
1 – 7 – 6 – ♭6 | 5 – 4 – 3 – 2
Suddenly eight quarter notes form one continuous line.
And notice something important: the bass isn’t simply describing the chord anymore.
It is creating direction.
That is one of the secrets of a good walking bass line.
Every note should make you want to hear where the next one is going.
⸻
Should You Write the Bass Line Out?
This depends entirely on who is going to play your arrangement.
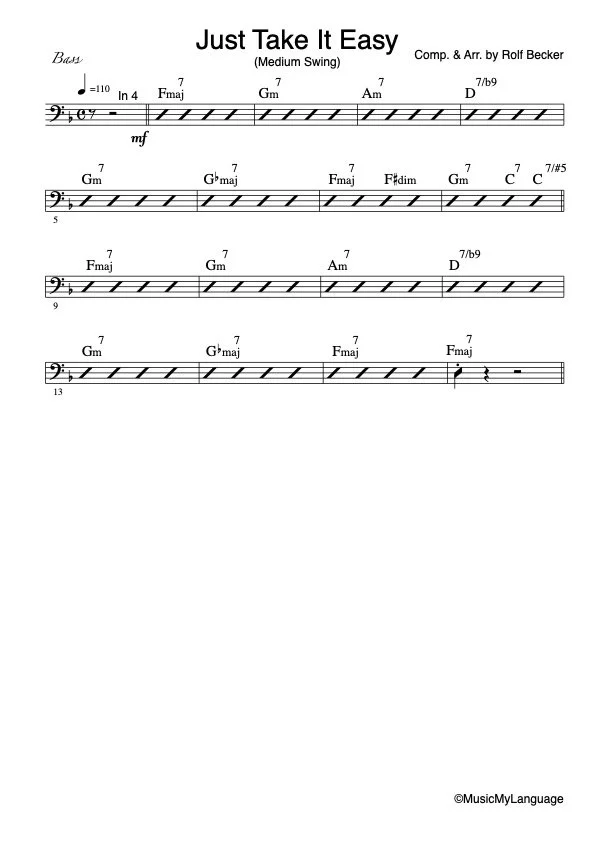
An experienced professional jazz bassist usually doesn’t need every quarter note written out.
Give an experienced player a lead sheet or bass part containing the chord progression and tell them:
“In 2.”
or
“Walk in 4.” (or just “In 4”)
…and they will know what to do.
In fact, allowing a good bass player some freedom can often produce a more natural result than trying to notate every single note yourself.
But there is an important exception.
Writing for Student Bands
If you’re arranging for a school ensemble, developing jazz band or educational publisher, I recommend a different approach.
Write out a suitable bass line and include the chord symbols above it.
I would also mark the intended feel — for example:
In 2
or
Walking in 4
Why both?
Because you’re doing two things at the same time.
You’re giving a developing bass player something they can perform successfully right now,
while also showing them how a bass line relates to the underlying chord progression.
Eventually, they may stop needing the written notes.
And that’s exactly what you want.
⸻
The Bigger Picture
The bass line is only one part of the rhythm-section puzzle.
A great bass player needs to know where the harmony is going.
The drummer needs to support the feel.
And piano and guitar have to provide the right harmonic and rhythmic framework without getting in the bass player’s way.
When all of those elements fit together, something wonderful happens:
The rhythm section stops sounding like four musicians playing individual parts.
It starts sounding like one instrument.
And that brings us perfectly to the next chapter of Inside The Arrangement:
Chapter 3: What Do the Piano & Guitar Players Do?
We’ll look at chord voicings, rhythmic comping, how piano and guitar can support the bass and drums -
and, just as importantly, how to keep them from stepping on each other’s toes.
See you in the next chapter.
Rolf Becker
Composer · Arranger · Conductor
MusicMyLanguage — Learn. Practice. Perform.
INSIDE THE ARRANGEMENT
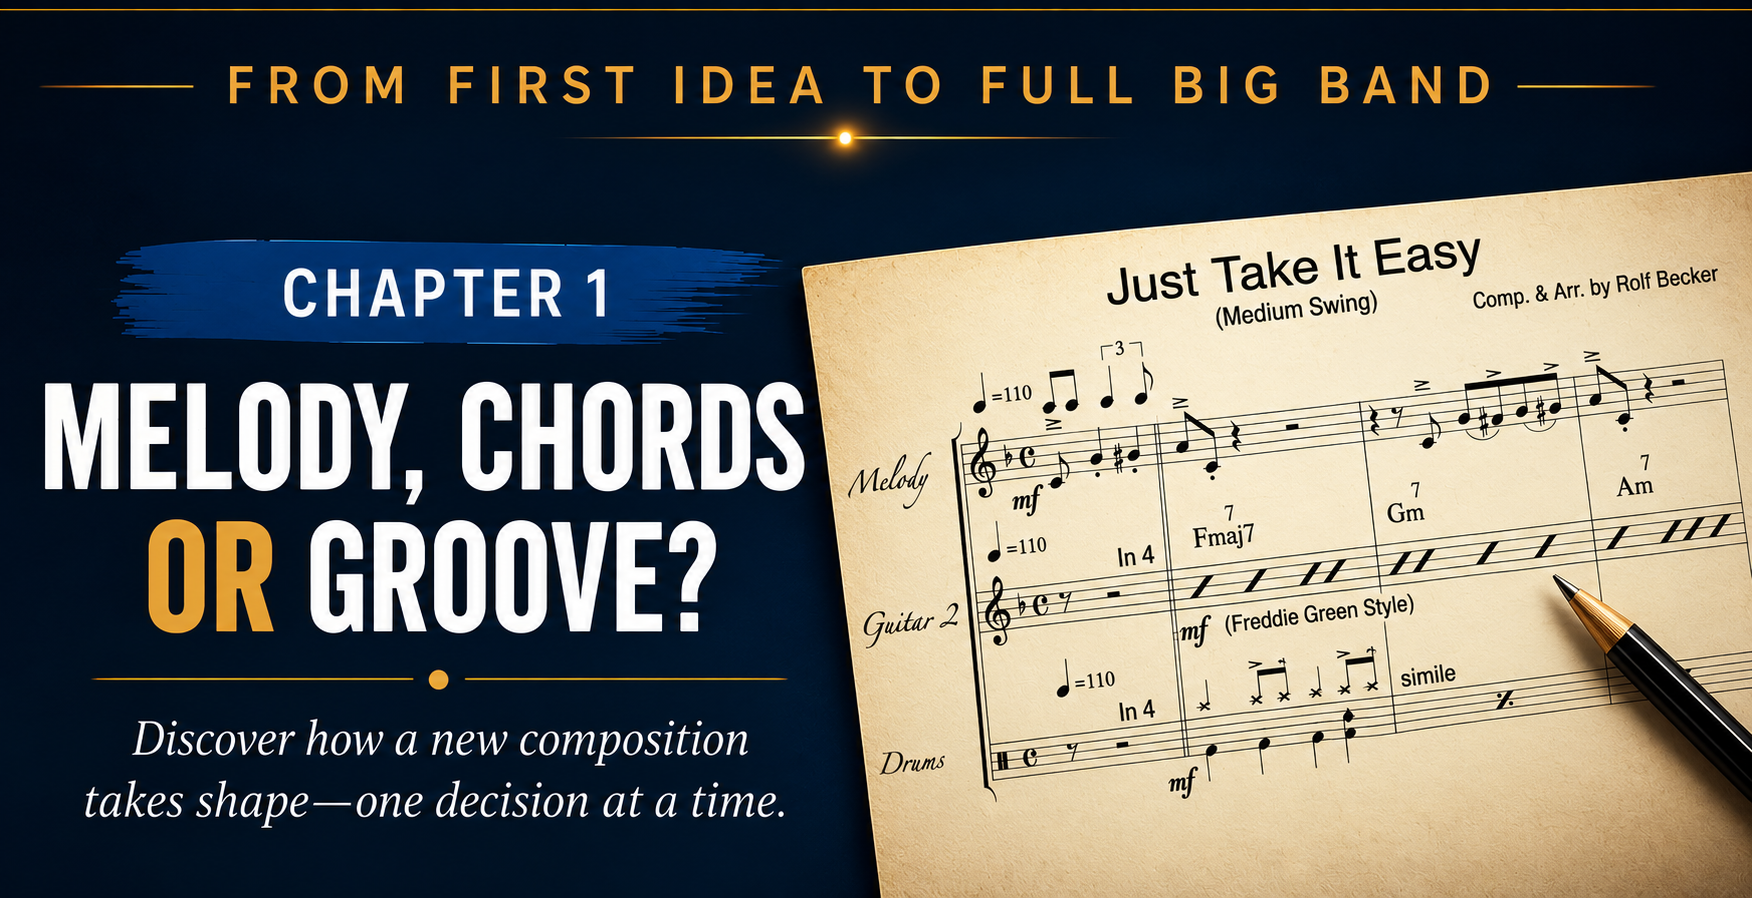
What comes first when composing a new tune — melody, chords or groove? Follow “Just Take It Easy” from its first musical idea to a complete big-band arrangement in this new step-by-step series, with audio examples along the way.
From First Idea to Full Big Band
Chapter 1 — What Comes First: Melody, Chords or Groove?
How does a new composition actually begin?
With a melody?
A chord progression?
A bass line?
Or simply a groove that makes you want to play?
The answer is:
Any of them can come first.
There is no single formula for composing an instrumental tune.
Sometimes a melody suddenly appears in your head.
Sometimes you discover a chord progression that creates exactly the atmosphere you’re looking for.
And sometimes everything starts with a rhythm or groove.
For this new Inside the Arrangement series, however,
I don’t want to talk about composition and arranging only in theory.
I’m going to show you.
We’ll take one of my original compositions and follow it step by step
from its basic musical idea through harmony,
rhythm-section writing and orchestration,
until eventually it becomes a full big-band arrangement.
The tune is called:
“Just Take It Easy”
It’s a medium-swing composition inspired by the classic Count Basie big-band tradition.
Tempo: Medium Swing — ♩ = 110
The complete composition has an AABA form,
but we’ll begin with only the first 16 bars.
Why?
Because before we start adding instruments, voicings, backgrounds and orchestration,
I want you to hear what happens to the music when we change just one element at a time.
⸻
The First Ingredient: Melody
Let’s begin with the most exposed version possible.
Just the melody.
No chordal accompaniment.
No walking bass.
No drums.
No big band.
When a melody is heard on its own, there’s nowhere for it to hide.
Listen to its rhythmic character. Notice the short phrases and the spaces between them.
Listen to the repetition and development of the musical idea.
And ask yourself:
What harmony would you hear underneath this melody?
Don’t look for the “correct” answer yet.
Just listen.
🎧 AUDIO EXAMPLE 1
“Just Take It Easy” — Melody Only
⸻
Now Let’s Add Harmony
The melody gives us our horizontal musical line.
Harmony adds the vertical dimension.
For Just Take It Easy, I chose a harmonic progression that supports the relaxed swing character
while still providing enough movement and color to make the melody interesting.
But instead of immediately adding the entire rhythm section,
let’s hear what happens when we add only the harmonic framework.
For this example, the chords are supported by Freddie Green-style guitar accompaniment
- the classic four-to-the-bar approach associated with the Count Basie rhythm section.
Listen again to exactly the same melody.
This time, notice how differently individual melody notes can feel once you hear the harmony underneath them.
A note that sounded neutral on its own may suddenly create tension.
Another may sound completely settled.
And the movement from one chord to the next starts giving the melody direction.
🎧 AUDIO EXAMPLE 2
“Just Take It Easy” — Melody + Chords
⸻
Melody and Chords Aren’t Two Separate Things
This is an important point.
When composing, I don’t think of melody and harmony as two completely independent layers.
They communicate with each other.
A melody note can suggest a particular chord.
But the opposite is also true:
A chord can change the way we hear a melody note.
And there is another element that can dramatically change both of them.
The bass.
Changing the bass note underneath a chord can alter its color, direction and function
- even when the notes above it remain unchanged.
We’ll explore that much more closely in the next chapter.
For now, however, something is still missing.
We have melody.
We have harmony.
But we don’t yet have the complete feel of the tune.
⸻
Enter the Rhythm Section
Now let’s add the rhythm section.
This is where Just Take It Easy really begins to reveal its personality as a swing tune.
The harmonic pulse is joined by a walking bass line and drums establishing the swing feel.
Listen to the same 16 bars again.
Nothing fundamental has happened to the melody.
But the musical experience has changed considerably.
Suddenly there is forward motion.
There is pulse.
There is interaction.
There is groove.
🎧 AUDIO EXAMPLE 3
“Just Take It Easy” — Melody + Rhythm Section
⸻
Listen Again — But Differently
Now go back and compare the three examples.
Melody
→ Melody + Chords
→ Melody + Rhythm Section
The melody hasn’t changed.
So what has?
Almost everything around it.
This is one of the most important lessons in arranging.
An arrangement isn’t simply about adding more instruments.
It’s about deciding what each additional musical element contributes.
Sometimes adding something makes the music stronger.
Sometimes removing something does.
And sometimes one carefully chosen bass note can have more impact than adding an entire section of instruments.
⸻
What Comes First?
So let’s return to our original question.
Melody, chords or groove?
There is no universal answer.
You can start with a melodic fragment.
You can sit at the piano and discover a chord progression.
You can create a bass line.
You can hear a drum groove.
You might even begin with nothing more than a rhythmic figure.
The important thing is to recognize when you have found an idea worth developing.
Then ask:
What does this idea need next?
Not:
What can I add?
But:
What does the music need?
That small difference in thinking becomes increasingly important as an arrangement grows.
Because eventually we’ll have many more possibilities at our disposal:
Saxophones.
Trumpets.
Trombones.
Piano.
Guitar.
Bass.
Drums.
Different registers.
Different voicings.
Different combinations.
Different colors.
But before we get anywhere near the full big band, we need to make sure that the foundation is right.
And that takes us to the bottom of the arrangement.
⸻
Coming Next: The Bass Line
Choose the Right Bass Line and You’re Golden
In the next chapter of Inside the Arrangement,
we’re going to take these same 16 bars of Just Take It Easy and look underneath the melody and chords.
We’ll examine the walking bass line.
Why this note?
Why not simply play the root of every chord?
How can the bass connect one chord to the next?
Where can we use chord tones, passing notes and chromatic approaches?
And how much of a bass line should an arranger actually write?
We’ll see it in the score and hear it in the music.
Because a good bass line doesn’t merely tell us what chord we’re playing.
It helps tell us where the music is going.
And when you choose the right bass line…
you’re golden.
To be continued in Chapter 2 of Inside the Arrangement — From First Idea to Full Big Band.